


Employing Coppercoat in the quest for the perfect bottom job (published December 2012)
The restoration and refit of our Pearson 424, Regina Oceani, has a focus on creating a craft that will be safer, more reliable, and—wherever possible—require less maintenance. The finishing of the bottom offers perhaps the best opportunity to save time and money over the long term. Compared to ablative or hard finishes that require a haul and recoat at least every few years, there are truly long-term options available. These require a bit of extra work and cost a little more up front, but the investment of dollars and labor stands to be returned many times over.
The movement away from ablative paints that release copper into the environment requires one to carefully select their bottom paint. Returning to the days of old, copper cladding was used to ward off bottom growth. The modern version of cladding is Coppercoat, a copper powder-laden epoxy bottom paint. While the copper content of Coppercoat is likely higher than any ablative paint, the copper does not leach into the water and thus is not subject to the emerging regulations regarding ablative paints. This product was developed in the 1980s and first became publicly available in the UK in 1991. Users report 10 or more years of clean bottoms without the need to repaint! A couple of boats have reported 20 years with just one touch-up at the waterline and leading edges after 10 years. Ten years—the equivalent of at least five hauls and re-applications of ablative paint. Now that’s what I call low-maintenance.
The Coppercoat for a new application on a bare hull costs about twice as much as a fresh set of coats on top of your current top-quality ablative paint. But between the costs of hauling and paint, the economics are very compelling. If you are paying someone else to paint your bottom, the savings become absolutely dramatic (and since I do almost all of the work myself, any labor bill is dramatic and traumatic to me).
PREPPING THE HULL
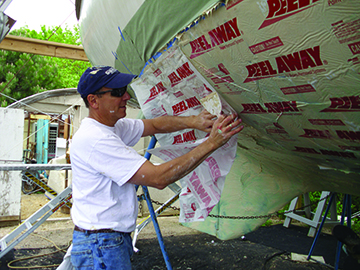
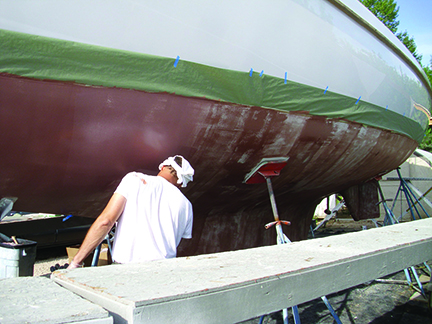
Coppercoat is a water-based epoxy and should never be applied over single part finishes, such as normal bottom paints. All of the existing bottom paint must first be removed. Not wanting to sand off all that old bottom paint, I turned once again to Erik Gertsen at Dumond Chemical. He recommended 12 gallons of Marine Safety Strip for the job. This is a safe, water-based paint remover that will neither burn your skin nor damage the underlying gel coat, fiberglass or two-part barrier coats.
The hull above the bottom paint was masked with a narrow strip of masking paper and then the Marine Safety Strip was applied with a wallpaper paste brush directly from the one gallon buckets it came in (easier than working with five gallon buckets). Two coats were applied to build a thickness of approximately 1/8”. The remover was then covered with the provided Peel Away sheeting, which was simply smoothed on with a flat hand.
The next day, wearing a Tyvek suit, painter’s hood, gloves and safety glasses, with plastic tarps spread, I pulled the sheeting with most of the remover and bottom paint into a waiting trash can. The last of the remover and paint was easily scraped off with a wide putty knife. The hull was then wiped with some denatured alcohol and rinsed with a garden hose. If you, like me, enjoy hard work and can watch it being done all day, check out the time-lapse video here: http://youtu.be/W4Z9SBpGyW8
This left us with a clean, black hull—black being the color of the barrier coat. The prior owner had peeled and sealed the hull and I am the beneficiary as there was not a single blister to be found in the bottom.
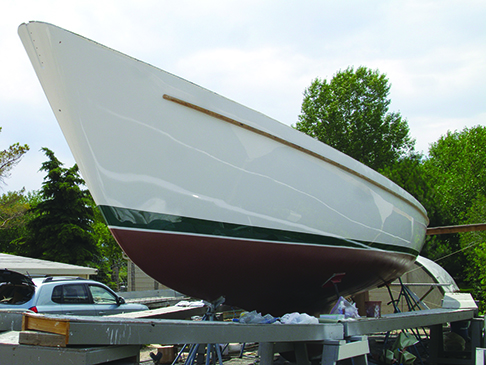
Coppercoat can serve as a barrier coat, but since I had installed new Marelon thru-hulls and finished them flush with the hull (which I’ll describe in a future article), I continued with the Alexseal paint system and applied two coats of their Finish Primer 442. This was then sanded with a DA sander at 60-grit to provide tooth for the Coppercoat.
UNLIKE ANY OTHER PAINT
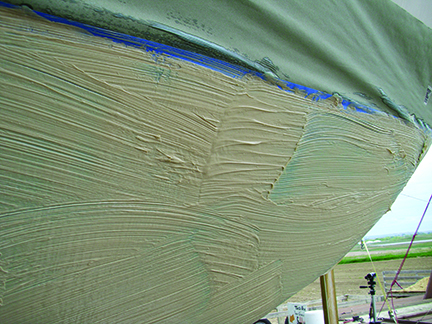
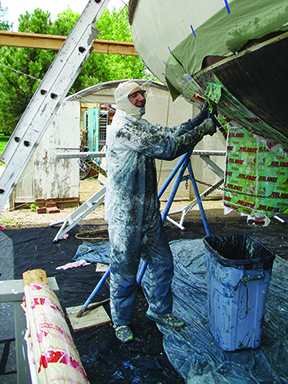
Coppercoat is unlike any other finish I have ever worked with. While it is fairly thick and very dense, it is applied in very light coats with a thin, solvent-resistant foam roller. It is very much worth watching the application videos at www.coppercoatusa.com before beginning the application. The paint is mixed in small batches. First, one container of each of the two liquid portions of each “unit” are combined and stirred. Next, a package of 99% spherical copper powder is mixed in and thoroughly stirred. A bit of 90% isopropyl alcohol from the drugstore can be used as a thinner to provide a bit more working time. Jill mixed paint while our daughter Camrenne and I rolled opposite sides of the boat from a single roller tray amidship (we pondered whether it is still “amidship” when it is under the keel), always keeping a wet edge.
After the first coat was applied, the primer was still very visible through the Coppercoat. This is exactly as it should be. Applying too thickly results in runs. The subsequent three coats were applied to a tacky but not wet surface, and should be done before the Coppercoat dries much beyond that. In areas where I had applied too thickly and the epoxy had not adequately cured, I found that the first coat was pulled up by the roller. I just had to allow a little more drying time and take care to apply thinner coats from that point forward. Do not “worry” the finish. A drip or run can be sanded smooth later. Cleanup of tools is accomplished with warm water—a 100-foot black garden hose left in the sun provided plenty of that.
A few days later, I moved the stands, sanded the primer there and a few inches into the Coppercoat field, then rolled those areas. I withheld one unit of Coppercoat for painting the very bottom of the keel once the boat is hanging in slings. The boat can be launched after three days of drying. (Ha! Would you believe 12 months later in our case?) Before launching, and after several years, to increase the effectiveness of the anti-fouling, it is recommended to burnish the bottom with 320-grit sandpaper on a DA sander, better exposing the copper powder. The ongoing “maintenance” of the coat consists of rubbing off any slime that might accumulate with a scrub brush or ScotchBrite pad and pressure washing when hauled.
THE SUPER-SLICK FINISHING TOUCH

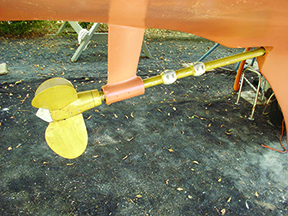
To complete the ultimate bottom job, the running gear should be protected as well. Motor yacht owners are familiar with a product called PropSpeed, a very slippery running gear coating that is known to reduce fuel consumption. It is a fairly expensive product but has a good ROI when one is burning many gallons of fuel each hour. Even the smallest “unit” of this product is enough to treat two sailboats’ running gear, so team up with your neighbor in the boatyard. PropSpeed does not rely on pesticide properties—it’s simply so smooth and slippery that nothing can adhere to it.
The application is simple, but does require some attention to detail. First, the running gear was sanded to a bright finish with 80-grit paper on a DA sander and by hand wherever the sander cannot reach. The sanding dust was then washed off with water and wiped with towels until the towels came away clean. From here forward, gloves should be worn to avoid touching the metal and leaving skin oils on it. Any shaft zincs should be installed at this point. Next, the metal was etched with PropSpeed’s acidic cleaner, which was brushed on and rinsed off before it dried. I did this a few times just to be sure. Finally, before any paint was applied, the metal was wiped down with denatured alcohol until lint-free rags came away clean.
The base of the two-part epoxy primer was mixed for several minutes to get any settled solids off the bottom of the tiny can and into suspension. Then the even tinier bottle of catalyst was mixed in, stirred for a few minutes, and allowed to react for a few more. This primer can be brushed or rolled on with a small foam roller. As soon as the primer was not sticky (about three to four minutes) the silicone polymer-based topcoat was applied, but only with a brush. It is best to do the job in small sections so the primer does not dry for more than a few minutes before the topcoat is applied. The science here is that the topcoat melts into the primer, forming a well-adhered but very slick, very smooth, very shiny finish.
The silicone topcoat remains somewhat soft and pliable throughout its life. The key to longevity is to avoid scraping the PropSpeed. Your cleaning diver needs to know that you have PropSpeed below and not to use any scrapers or scrubbers on it. A soft rag or diver’s glove is all that should be used for cleaning. Keeping the running gear clean should simply be a matter of running the prop at least once every 30 days or so. Similar to other coatings below the waterline, PropSpeed is subject to failure due to electrolysis, so keep your shaft and prop zincs in good condition (I always run dual prop zincs in case one comes loose).
THE PERFECT BOTTOM JOB?
Is this the perfect bottom job? If the testimonies on the Coppercoat and PropSpeed websites are any measure, it could prove to be. Ask me again in three, five…or maybe 10 years.
 BWS is following Pete and Jill Dubler’s refit and restoration of Regina Oceani in Fort Collins, CO. Pete emphasizes that doing the work yourself creates intimacy and familiarity with her systems and a special pride that writing checks just can’t offer.