


Part I: Maintaining your windvane for the long haul (published October 2014)
No matter how hard the wind blows, a windvane self-steering system is your vessel’s round-the-clock helmsman. So it makes good sense to maintain the vane gear in top condition at all times. Even after a 35,000-mile circumnavigation, you should expect your vane gear to perform as well as the day you first installed it—for your next circumnavigation!
Performing the following procedures will keep your windvane steering system functioning properly with few hassles and will aid you in making major repairs in the unlikely event that something goes awry far from modern machine shops or FedEx offices.
INSPECTION
Your pre-departure checklist starts with checking all fasteners, which should be snug, particularly at the mounting brackets. Large rings of brown rust around bolt heads or nuts indicate a loose stainless steel fastener and obviously some corrosion. All stainless fasteners must be rated 316L—absolutely nothing less will do.
Your windvane’s biggest enemy is crevice corrosion, which eats straight through stainless in anaerobic conditions. Surface corrosion is bad too, but it will probably allow you to get to your next major port before switching out the fasteners.
Inspect the rest of the unit carefully for thin cracks, the telltales of crevice corrosion, especially in stainless welds and at the undersides of mounting tubes. Such seemingly harmless lines of rust may hold up in fair weather, but imagine what extreme torsion can do to the windvane’s mounting tubes during a week-long full gale in the mid-Atlantic in January, surfing down 25-foot seas. Crikey!
Next, rotate the airvane turret 360 degrees to ensure easy adjustment for wind shifts. Also, rotate the airvane, or airfoil, either vertically or horizontally, depending on the design, making sure it moves easily.
Check turning blocks, fixed blocks and fairleads to ensure the sheaves turn smoothly. Also, run the steering lines, if any, through the blocks to make sure there is nothing blocking the lines’ paths on the way to the helm.
Finally, make sure the steering line attachment system at the tiller or wheel—which must be mechanical, not hydraulic—is firmly installed, with no play in the fasteners.
BUSHINGS, BEARINGS & SLEEVES
In a perfect world, every vane gear would be accompanied by a complete spare parts kit supplied by the manufacturer. But since boats, sailors and vane gears go through many lives, take time to assemble a set of whatever hardware you may need to replace after crossing a couple of oceans including nylon or Delrin bushings, bearings and sleeves. Many windvane manufacturers will gladly sell you a set of replacement parts, including detailed instructions, for a reasonable price, even for obsolete models.
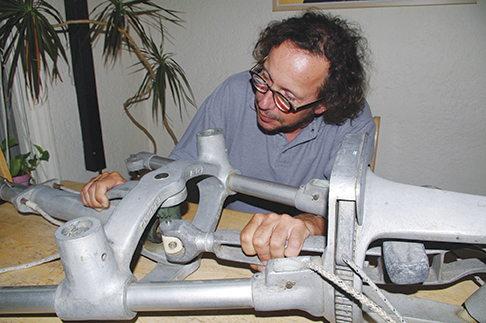
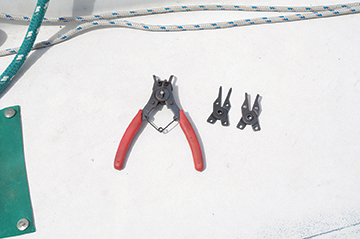
To remove a bushing or bearing race, first remove the setscrew. On some models, you may need to use a pair of circlip, or spring clip, pliers to remove the flexible stainless ring at the top of the vane turret. Remember to secure the circlip with a string through one of its eyes to keep it from ricocheting through the mast orchard.
Stubborn bushings or bearing races may require blunt force for removal. Instead of using a metal drift, hammer a hard wooden dowel into the space to prevent cuts and scratches in the metallic surface. And be especially careful with anodized aluminum, which should never come into direct contact with any other metal.
When disassembling bevel (pinion) gears to inspect the teeth or access bearings, mark the bronze or stainless surface with an indelible marker for easy reassembly.
Reassembling a vane turret with its new bearings does not have to be a nerve-wracking experience. A thick dowel through the turret will make the job a lot easier. Hans Bernwall of Scanmar International suggests using shaving cream to keep bearings in place during reassembly of the Monitor vane turret. After finishing the job, simply rinse the unit with a water hose to remove the shaving cream.
Most modern vane gears use Delrin or Torlon plastic bearings, which require no lubricant, only an occasional rinse with fresh water to keep them clear of salt crusts. For stainless bearings, apply a thin coat of marine grease and check frequently for easy movement. When grease and saltwater mix, they emulsify, dry and form a thick paste, which hardens and forms rigid cement if not cleaned and repacked frequently.
During assembly, remember to use Loctite on setscrews and other fasteners to keep bearings from coming loose.
BLOCKS & CONTROL LINES
Permanently riveted blocks with polymer bearings and sheaves do not permit any sort of maintenance aside from washing in freshwater. When they wear out, replace them and use the old ones for less demanding jobs.
Higher-grade blocks may be disassembled and even fitted with new plastic bearings. Use caution in reassembling these units; they commonly contain two sizes of bearings in concentric grooves on either side of the sheave.
The likelihood of encountering metal bearings in swivel blocks these days is slim, but if you do, clean them with kerosene or diesel, not gasoline, which is extremely volatile. Better yet, throw them away and replace with high-quality blocks with stainless or aluminum cheeks and high-density plastic sheeves and bearings, such as those offered by Ronstan, Harken and Garhauer.
Control lines are the weakest link in any servopendulum (e.g., Monitor, Sailomat, Fleming) self-steering installation. Thin, double-braided polyester line takes a beating while passing over sheaves millions of times during an ocean crossing. Verify that the line diameter matches the blocks; servopendulum builders recommend ¼-inch to 3/8-inch line, depending on the model. Overly thick line will not move freely through the cheeks and will begin to fray early in your next passage.
A trick to getting added life out of your control lines is to cut them several feet longer than needed. This way you can occasionally advance them several inches to prevent excessive wear at one point. Also remember to rotate the direction of control lines every few thousand miles and proceed through the same gradual advancing to get more mileage out of the line.
Leaving a little slack in the control lines prevents oversteering and adds to the longevity of the polyester fibers. Experiment with the amount of slack. Sailing to windward in a gale—yes, it happens—will demand tighter control lines, while milder conditions will permit a bit of slack. Trial and error is the best teacher here.
DAMAGED WINDVANE STRUCTURE
Only a qualified welder can carry out repairs on broken welds or split tubing on stainless steel or aluminum. For stainless, make sure the welder is using a TIG (tungsten inert gas) outfit to ensure a clean, professional weld. Brazing with a brass rod is not hot enough and will only make a bigger mess for the next welder to clean up and repair. Unshielded arc welding, or stick welding with regular steel rods, is also inadequate.
Welding aluminum requires a great deal of skill. Excessive heat can cause annealing, which weakens the affected metal and ultimately leads to structural failure under extreme loads. TIG works well for aluminum as well. When welding pieces 1/4-inch or more in thickness, the welder should use MIG (gas metal arc welding), which incorporates a wire feed to fill in the deep crevice between the welded edges.
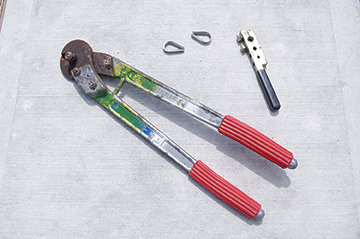
For a loose or wobbly mounting system, you can reinforce the vane gear mast and mounting tubes with rigging wire and turnbuckles attached to the stern pulpit or some other solid structure. With a Swage-It tool, a handful of thimbles and ferrules, small turnbuckles and a coil of used halyard wire, you can create all sorts of expedient rigging, including jib pendants and hold-downs for propane tanks and other equipment that must be fastened solidly to some surface.
BROKEN AIRVANES
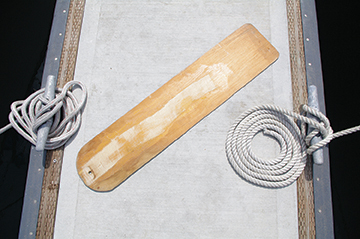
An airvane cut from thin plywood may crack or break completely in gale conditions, even if it is a storm foil. To reduce the chances of this occurring, line each side of every 1/8-inch plywood foil with a long strip of fiberglass and resin. It may not be very pretty, but neither is hand steering through a gale and mountainous seas at 0300, when you could be down in the cabin eating leftover ramen noodles and sipping chateau carton.
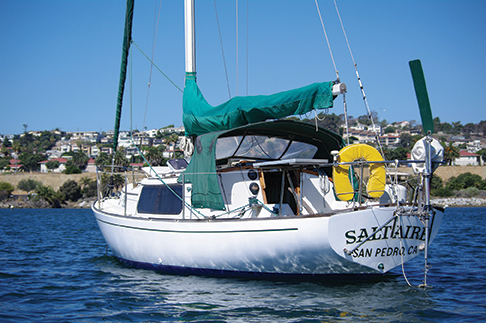
If a mean gale snips your storm vane off right at the turret, as happened to my vintage Cal 30 Saltaire during a full knockdown in the northern Red Sea, you can approximate the original size in thin plywood by cutting it roughly 20 percent shorter than the standard foil and slightly wider at the top. Round the edges, sand lightly, reinforce with fiberglass strips and paint the surface to protect it from the elements.
You can expect decades of service from your windvane self-steering gear, whether it is a servopendulum like the Sailomat, a trim tab such as the AutoHelm, or a totally wind-controlled Hydrovane. The key to longevity in this equipment is a combination of developing operational skill and maintaining your vane gear for top performance.
Bill Morris completed a circumnavigation, two-thirds singlehanded, via the Suez and Panama canals aboard his 1966 Cal 30 Saltaire. His philosophy is to harness wind, sun and muscle as much as possible to provide power for onboard systems. Bill is the author of The Windvane Self-Steering Handbook, published by International Marine.