


Baking the best bread at sea (published June 2012)
Nothing beats the taste, texture and aroma of a loaf of freshly baked bread. But baking at sea is, if not a challenge, at least difficult. For a long time, I made bread following the conventional wisdom of my Jewish grandmothers: proof the yeast; add the flour, water, salt and other ingredients; let the dough rise in a warm place; punch it down; let it rise again; form a loaf or put it in a bread pan; let it rise again; put it in an oven at 350ºF; bake for one hour; let cool; slice; butter; eat. This takes forward planning and lots of steps. At sea, I made “engine room” bread using a “sponge” step. This bread could rise in a warm engine room if the motor had been running, but it restricted our best bread days to the time we motor-sailed or were under power.
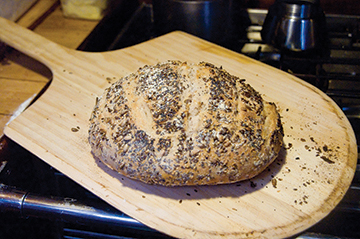
In spite of my efforts, I was never able to make the wonderful bread that Italian and Jewish bakeries turned out. You know the type—a round loaf with a crunchy, dense crust and a wonderfully chewy inside. It would keep its texture for several days (if it lasted that long). This kind of bread, once commonplace, is now called “artisan bread” because it apparently needs to be handmade, or at least taste like it.
While sailing in Queensland, a friend showed me a book called Artisan Bread in Five Minutes a Day by Jeff Hertzberg and Zoe Francois. He had been baking some excellent bread, he said. I skimmed the methodology (about two pages for the basic loaf). The authors claimed I could make artisan loaves in my own oven with very little effort, so I went back to Beatrix to adapt the concept to a seagoing galley.
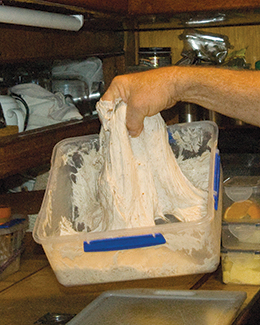
The method is astonishingly simple. The base is a no-knead moist dough that can be made in a few minutes and stored in the refrigerator for up to two weeks. All you do is mix flour, water, yeast and salt in a plastic container and store it in the fridge. No kneading, no proofing of the yeast, no rising, no second rising, no covering of loaves, no planning a half-day ahead to enjoy a loaf. When the crew wants fresh bread, the galley cook simply scoops out some dough, works it a bit, lets it sit for 40 minutes and bakes it in a very hot oven for about 30 minutes. This is almost instant bread, with very little effort involved.
As I searched the Internet before writing this article, I found that no-knead bread has been used by bakers for years; recently, a plethora of no-knead bread baking books have been published. But the basics are almost the same—variations on a theme.
There are just a few “secrets” involved with this method. These include the use of unbleached white flour, a very hot oven, placing a container of water in the oven to raise the humidity, and baking the loaf in a very hot oven on a baking stone or pizza stone.
It is very easy to begin with the basic recipe and then experiment with the methodology, ingredients and bread types. This very forgiving method nearly always produces a wonderful product. After making a great basic Italian loaf I attempted to reproduce the corn rye from the Jewish bakeries of Los Angeles that I remembered as a kid. The results were astonishingly close! I then tried a seeded herb bread—again, wonderful results. The only drawback to this method is that you may gain weight because it’s hard to not eat “just one more slice.”
So how does this bread-baking revolution work at sea? It’s perfect! The equipment and time involved are minimal, and the result is scrumptious, crusty, artisan bread available in an hour-and-a-half. Best of all, it can be easily accomplished at anchor or underway in nearly all conditions.
Here’s the basic method.
TOOLS
• A plastic bucket or container with a lid. The lid does not have to fit tightly.
• A baking stone. This can be a pizza stone (available from most cooking stores for about $15) or an unglazed terra cotta paver from the tile store ($4).
• Baking paper, sometimes called “baking parchment,” which is used as a disposable non-stick surface under the loaf.
• Optional oven thermometer. The accuracy of seagoing ovens is not great. This is the type of thermometer often used with barbeques; it has a remote probe that goes in the oven and a battery operated display (about $20). If the oven is too hot, the crust will burn; too cool and the interior will be under-baked.
• Optional pizza peel (also called a pizza paddle), which is a wooden flat board that looks like an oversized ping pong paddle and is used to slide the uncooked dough into the oven and to remove the finished loaf. You can also use a flat metal cookie sheet or wooden cutting board that will survive contact with the hot baking stone.
INGREDIENTS
• Plain, unbleached white flour. Whole wheat flour can be added, but 100% whole wheat is too low in protein (gluten) to work well. For whole wheat or rye bread, add no more than 50% of the non-white flour.
• Water.
• Yeast. Granular yeast works fine and is easy to keep and handle at sea.
• Salt. Preferably coarse or kosher salt without iodine.
• Flour or cornmeal for dusting.
MIXING AND STORING
1. Start with two pounds of flour. Place in the container.
2. Add lukewarm (100ºF/38ºC) water (about ½ the volume of flour).
3. Add 1½ tbsp granulated yeast and 1½ tbsp salt.
4. Mix ingredients. I use a wooden spoon, but hands work, too. Snap lid in place.
5. Store the container in the refrigerator. The lid should NOT be airtight in order to let fermentation gasses escape. If you want bread that day, let the dough set at room temperature for two hours and leave in the refrigerator for four more hours. It can be stored for up to two weeks, ready to use whenever you want.
*Note that this base can be used not only for loaf bread, but also for pizza bases, hamburger buns, baguettes, olive bread and herb bread. It can also be baked in a pan or Dutch oven.
FORMING AND BAKING
1. Turn on the oven early so it is ready at 450ºF when the rising period is finished. The baking stone should already be in the oven (on the middle rack if you have one).
2. Place a broiler pan or oven-proof container of water in the lower part of the oven to generate high humidity.
3. Grab the amount of dough you want to bake. A ball 4” to 5” in diameter will make a nice loaf for two to four people. You will see that the dough has become very sticky and stretchy.
4. Put the dough on a floured board (or the pizza peel) and, using your hands, work some flour into the dough to give it some stiffness. It’s not necessary, but I like my bread to have a rounded appearance. This is also the step where I fold in herbs, olives or seeds.
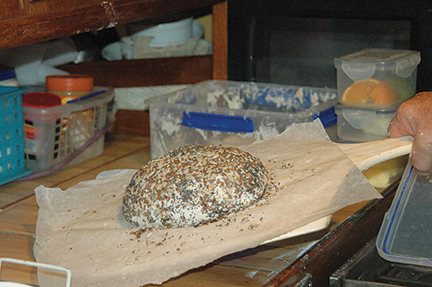
5. Cut a piece of baking paper a bit larger than the dough ball and put it on your pizza peel. Dust the paper with cornmeal or flour.
6. Place the dough on the paper.
7. Wet your hands and run them around the dough until it’s good and wet. This helps form the crispy crust.
8. If you like, take some seeds (e.g. linseed, sesame, pumpkin or sunflower) and press them into the dough.
9. Let the dough rise, untouched, for 40 minutes.
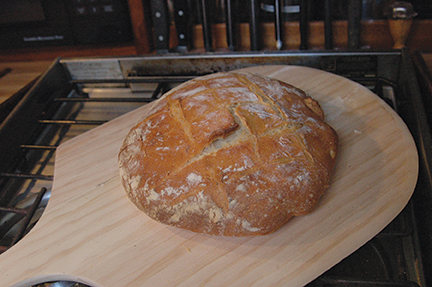
10. Use a serrated sharp knife to slice some cross-hatching into the uncooked loaf and add a light dusting of flour.
11. After the 40 minute rise time, slide the bread (with the baking paper underneath) from the pizza peel onto the hot pizza stone.
12. Bake 30 minutes or more at 450ºF. This high temperature allows the crust to become crisp and crunchy and the heat shock works to form the chewy interior.
13. Use the peel to remove the bread from the oven. The bread is done when you can thump the bottom with your fingers and it has a hollow, drum-like feel.
14. Allow the bread to cool thoroughly. Yes, it’s nearly impossible not to cut a slice right away, but it will keep better and taste better if you restrain your appetite and allow it to cool down. Use a cooling rack if you have one. The bread keeps best at room temperature, unwrapped, with its cut side face down.
Jeff Stander has been living aboard his Kelly-Peterson 44, Beatrix, since 1997. He and his co-captain Kathy have cruised Alaska, the US West Coast, Mexico, the South Pacific and Australia from Queensland to Tasmania. Currently in Sydney, he plans to be in New Caledonia and Vanuatu shortly.