


Tips for replacing tang assemblies and tuning your rig (published January 2014)
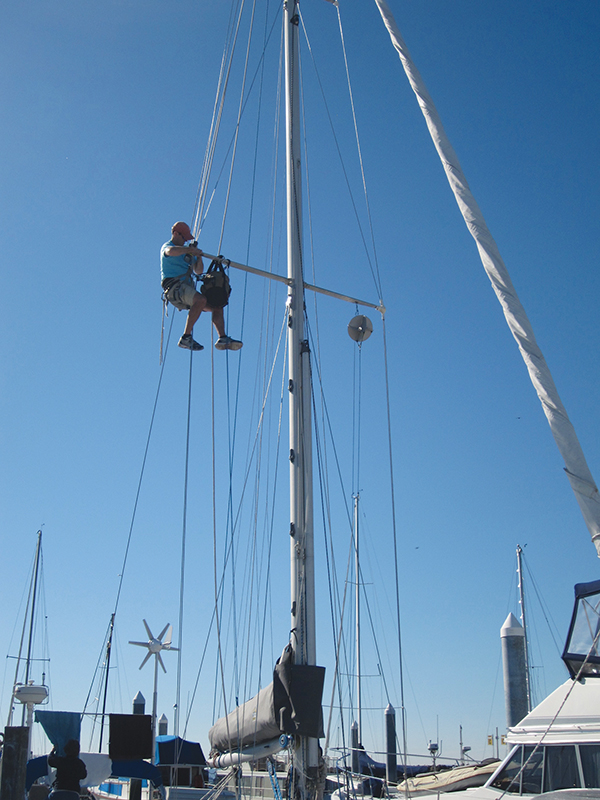
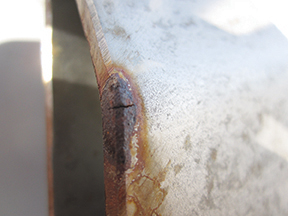
As I hoisted myself up the mast I could see rust stains on the lower starboard shroud tang and when it reached eye level I quickly noticed small hairline cracks emanating from the rust spots. There was no need for a magnifying glass to see if these cracks were superficial blemishes or deeper fractures. Cracks in anything metal on a sailboat are not good, and being on a key part of the rig, these were in a particularly critical spot. And though the apparent severity of the tiny cracks probably wasn’t going to take the rig down in a blow tomorrow, replacing them became a priority on my to do list.
Just a few years earlier, the previous owner of our Grand Soleil 39, Yahtzee, had pulled the rig and beefed it up to go offshore prior to a two-year cruise from the Pacific Northwest to Mexico, the South Pacific and back. In that time the rig had collected its fair share of salt and the elbows of these tangs obviously didn’t take the exposure well. Interestingly, though, a professional inspection of the rig only revealed this one weak spot. It must have been some anomaly about that particular set of tangs that caused them to rust.
After consulting with my friend, rigging specialist Cliff Hennen at West Marine Rigging Seattle, we got new port and starboard lower tang assemblies ordered from LeFiell Manufacturing and I planned to do a full tuning of the rig after replacing them.
INSTALLING NEW TANGS
 Having worked as rigger, installing new tangs wasn’t a job I felt uneasy about doing on my own. But I do understand that many sailors feel the need to have a professional do this for them. If you are confident going up your mast and spending time working on your rig, then doing this job by yourself is certainly not out of the question and is a great experience.
The tang assemblies on Yahtzee’s mast are through-bolted instead of being connected with T-ball terminals or other types of fittings that fit into a hole in the mast. This makes the overall job slightly more difficult as there are a few more parts involved while working up on the rig.
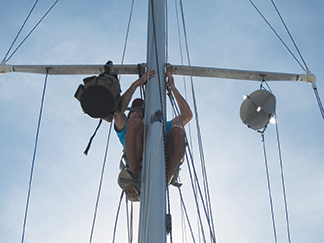
I started the job by completely loosening the forward and aft lower shrouds on both sides to ensure there would be no tension on the old fittings as I went to remove them. I then hoisted myself to the first set of spreaders and got settled in to remove the through bolt and tangs. Most through-bolted tangs have a compression sleeve around the bolt inside the mast that won’t allow you to over tighten the bolt and bend the mast. Some of these compression sleeves are held in place inside the mast and others are not, and unfortunately, there is only one way to find out. If you are not sure, be ready with a dowel or something similar to take the place of the bolt and hold the sleeve. Otherwise, the compression sleeve may drop to the bottom of the mast, which can be extremely difficult to retrieve.
 Once I removed the bolt and inspected the sleeve I lowered myself back down to the deck to swap the old rusty tangs out for the shiny new ones. Doing this aloft would have meant lots of fumbling with pins and tangs, which could have resulted in me dropping something important overboard. Being careful not to twist the shrouds, assembling the new tangs to the end fittings was a breeze and I connected both sides to my harness and hoisted myself back up.
When I was back in place on the rig I went through the opposite procedure of taking the tangs apart. When the through bolt was in place with the new tangs I applied some blue Loctite to the threads and tightened down a Nylock nut. It is important here to use a new Nylock as the nylon collar in the old nut has been damaged and won’t offer as much friction.
Replacing the tang assemblies on our mast actually turned out to be the easiest job of my entire rigging project. Tuning, on the other hand, would take a bit longer.
TUNING THE RIG
 Tuning a rig isn’t terribly difficult, yet if you polled the average cruiser on how frequently they tuned their rig, I’m guessing a good majority would say not very often. Being the performance-oriented cruiser that I am, I’d surely find myself in the minority. Having a finely tuned rig is not only crucial to performance, but is also important for the overall maintenance and longevity of your rig. A poorly tuned mast will wiggle, pump and bend in all sorts of weird ways that will cause extremely poor sail shape and could also lead to a failure.
Yahtzee has a double spreader rig with cap shrouds, continuous intermediate shrouds, forward and aft lower shrouds, a headstay, removable inner forestay and a single insulated backstay. Before beginning the tuning process I loosened all the shrouds, slightly eased the backstay, removed the inner forestay and left the forestay at its current setting.
Prior to starting the tune at deck level I went aloft to do a masthead to deck inspection of every fitting, pin, terminal and connection for signs of corrosion or fatigue. I also unwrapped the spreader boots to check the spreader ends and make adjustments as needed. It is important that the spreaders bisect the shrouds at equal angles and that the spreader ends are securely fastened to the shrouds. Having a spreader pop off a shroud in heavy weather is a quick way to lose a rig.
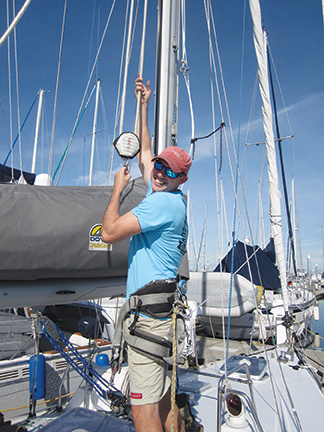
When tuning any rig, the goal is to get the mast in column from top to bottom, so I started by adjusting the cap shrouds first to get the masthead on centerline. Before tightening either shroud, though, I attached Loos gauges to both sides so I could check the tension as I worked back and forth. Many people successfully use the halyard method of measuring turnbuckles when tightening a rig, but I’ve found that Loos gauges are far more accurate. When I was ready to begin tightening the turnbuckles, I started on one side and gave it a few turns, then moved to the other side and gave it the same amount of turns. Once the shrouds started to tighten I looked up the mainsail track to make sure the mast was straight and checked the Loos gauges as I worked back and forth until I got to about 20 percent of the shrouds breaking strength.
When the cap shrouds were properly tensioned I moved to the forward lower shrouds and repeated the process above. The reason for tensioning these before the intermediates and aft lowers is to pull the middle of the mast forward to build in some prebend. Putting prebend in the mast will help it flex forward instead of back, which will make the mainsail flatter and keep the boat balanced in a fresh breeze. My final number for the forward lowers ended up at 14 to 15 percent. After doing the forward lowers I tensioned the aft lowers. These don’t need to be as tight as their counterparts, as they are not pulling the mast forward so I aimed to get them at about 10 to 12 percent. Lastly, I tightened the intermediates where I was mostly looking to keep the mast directly in column between the masthead and the tangs for the lower shrouds, and hit about 10 percent of breaking strength on the Loos gauge.
Overall, this tuning process was not hard, especially because I had the gauges, but it did take a fair amount of time as I worked back and forth on each set of shrouds to get the proper tension I needed and to keep the mast straight.
DYNAMIC TUNING
Whenever tuning a rig it is important to keep in mind that the final tensions you get to, whether on a Loos gauge or otherwise, are always a rough starting point. The real test of how well your rig is tuned is decided when you get out on the water in a good 10 to 15-knot breeze and see how the mast behaves. This is called a dynamic tune and is just as essential as what you did at the dock, if not more.
When tuning underway, I like to start close hauled and tack back and forth to see how the mast looks under different loads before making any adjustments. In general, your leeward shrouds should never be fully slack when sailing close hauled in a stiff breeze and you’ll be able to see that pretty quickly.
To check your work from earlier, look to make sure the prebend that you put in the mast is still there. If not, you may need to tension the forward lowers a bit more. Next, go to the mast and sight up the mainsail track like you did when tuning the rig at the dock. Look to see how the mast is bending, if at all. If the middle of the mast is falling to leeward you probably need to tighten the intermediates and lowers. It’s ok for the top of the mast to fall slightly to leeward, but not much. If it looks wrong, it probably is, so go ahead and tighten the cap shroud. If you do decide to tighten anything, always do it on the leeward side so you aren’t fighting against the loaded rig. Trying to tighten turnbuckles under tension will be hard, but could also result in damaging the threads.
Inspecting and caring for your sailboat’s rig is essential to keeping a well-maintained and seaworthy cruising boat. And while it is important to have your rig examined by a professional, especially if it is a complicated setup, the average boat owner can actually do much of the work. Just make sure to give yourself a good amount of time, as this is one of those projects that will take longer than you think. But hey, at least the final step involves sailing.