


Refinishing Regina Oceani’s middle-aged hull (published October 2012)
It takes a great deal of bravery, faith and endurance to refinish the hull of a 31-year-old, 42-foot sailboat. And it should be said now: “Caution: The photographs in this article may not be suitable for all boat owners.” But the rewards when pulling the masking off that last time are worth all the work.
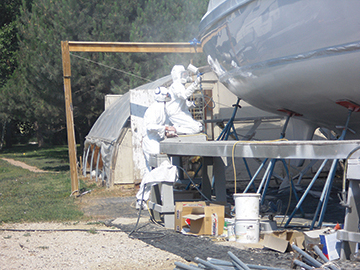
In preparation for painting the hull, we built large sawhorses and 16-foot long, two-foot wide scaffold platforms to wrap around the boat. An 18-inch high, three-foot wide aluminum work platform could be moved around on the scaffold or on the ground to provide just the right working height for the top of the bow or the top of the boot stripe. Transom lettering was removed in short order with the aid of a heat gun and scraper. The other key preparation was downloading and reading the new Alexseal Professional Application Guide, which covers absolutely every aspect of using their products correctly.
Before any sandpaper or grinders hit the hull, it must be surgically clean. Any trace of wax or silicone not completely removed would be irretrievably ground into the gel coat, later causing fisheyes in the paint. The hull was scrubbed with a ScotchBrite pad, plain dish soap and lots of running water—twice—until all water sheeted off the boat smoothly. Finally, using the two-rag method (actually lots of pairs of rags), the hull above the waterline was wiped down with Alexseal Surface Degreaser/Dewaxer—again, twice. I applied and Jill followed me with the removing rag, always wiping in one direction, thus moving any residual dirt eventually off the edge of the boat.
To keep a record of the location of the boot stripe before it was obliterated, using a framing square I drew reference marks 16 inches below the top and bottom of the stripe. At each point, a horizontal line and two vertical lines were marked. This way the square could be put back at exactly the same angle later to transpose the marks back up the boot stripe level. Half-inch wide green masking tape replaced the pencil marks to provide more permanence during the work to come. These little green marks tended to spur more curiosity from visitors than any other aspect of the project.
THE OMG PHASE
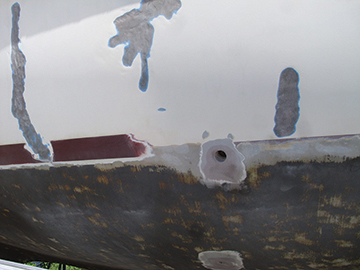
In about the same seven hours that it took to clean the hull, a complete eyesore of a seemingly derelict boat was created by grinding out the dents, dings and cracks in the gel coat. I used an angle grinder with a stone—very carefully and somewhat gradually—to trace out every gel coat stress crack. The grinding had to go just deep enough to where no signs of the crack remain in the underlying fiberglass. A rag with a bit of acetone can expose residual cracks. At the end of this day, removing respirator, goggles, gloves and Tyvek suit, a man of lesser faith would have given the boat away for scrap or kindling and gone home weeping and blathering something about swallowed anchors. This is the phase when everyone would come by and say, “OMG, what have you done!?”
Returning to the crime scene the next morning, all of the grinding was sanded out to smooth shallow-dished wounds using a 40-grit sanding disc on a DA sander. After a bit of cleaning with acetone, the deepest of the furrows was built back up with epoxy resin, using cabosil and chopped glass fillers.
PATIENCE…
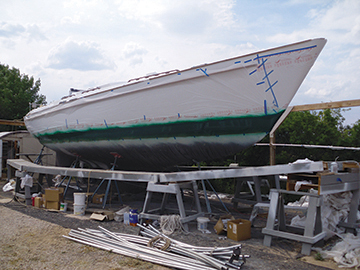
Before any fairing compound could be applied, the surface had to be sanded with 80 grit and primed. With the rub rail and deck masked, we were ready to blow off and clean the hull with Alexseal Wipe Down Solvent, again using the two-rag method. Three coats of Alexseal Super Build 302 were sprayed. With the victim now covered in a 36-mil thick white sheet, it was time to rest up for “the big sand.”
Driving up the next morning, the white boat looked pretty good…from about 300 feet away. It was time to start filling the wounds. The primer in the ground out areas was DA sanded with 80 grit. This provided “teeth” for the Alexseal Fairing Compound 202 to grip but left plenty of primer in place. For the first coat of fairing compound, I used the standard converter, which provided a nice, long 30-minute pot life even at 85° F. Since I was filling a lot of area, this worked well, but the cool nights of Colorado required longer—about 48 hours—until the filler was truly ready to be sanded.

MR. SANDMAN
The next 40 hours of labor involved the repetitive application of a guide coat of diluted machinist’s dye, block sanding at 120 grit with a 24-inch long board, blowing off, filling some more and administering Advil. I found that a pump-up handheld garden sprayer was the perfect tool for applying the guide coats quickly—best if held upwind.
For the next four applications of fairing compound, I used the fast converter, which provided the advantage of overnight curing so sanding could resume after the sunrise dose of Advil. By and by, the amount of filler required for each coat got smaller, the roll of sand papers shorter, and the shoulders sorer.
After four rounds of filling and sanding, three more coats of Super Build 302 were sprayed. This thick base filled in sanding scratches and lended enough additional working surface to provide the almost final fairing so necessary when the boat will end with a super glossy finish—remember, I was working on faith at this point.
Block sanding at 150 grit revealed plenty of defects, but all were very, very shallow. One last round of fairing compound and another block sanding around the defects was followed by two coats of spot priming with 302. At this point, the long block had done its job (on my back and arms—I must have put two inches on each bicep) and I could safely switch to a DA sander without worry of creating any waves in the now very fair hull. The trick was to keep the pad flat on the hull’s surface, use light pressure, and keep the tool moving at all times. A once-over after guide coat was applied, uncovering the slightest of final defects. These were filled with a two-part high-quality polyester glazing compound from the auto body supply house. A bit of spot priming, a light sanding of the slightly glossy spots, and finally, the boat was truly fair.
RECORD HEAT
After board sanding the Super Build primer, the sanding scratches must be filled with a smoother primer, Alexseal Finish Primer 442. After blowing off the dust, wiping down twice with Wipe Down Solvent, and lightly wiping with a tack rag, the hull was ready to receive three coats of 442. This left the boat with a light gloss. From 50 feet away, one might have thought the painting done. But the Sand Man never seems to sleep—a DA sanding at 320 grit with a spray can lacquer guide coat revealed a few runs or curtains in the finish primer, which were quickly chased away.
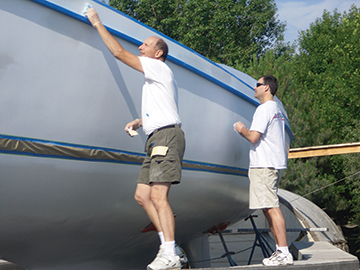
It was a record week for high temperatures in Colorado. In spraying the Alexseal “cloud white” Topcoat 501, perhaps the heat got to me and I failed to consider its effect on the flow out of the paint. While I got a pretty glossy finish, it had a slight orange peel, which just was not right. Nonetheless, Jill and I went ahead and laid out the boot stripe by measuring up from the index marks, placing short pieces of tape on the hull where the stripe presumably had been. We then proofed the curve with some yellow string taped to the hull at the new marks. After a bit of string adjustment, fine line plastic masking tape was used to provide the crisp line. Plastic masking sheet covered the hull above the stripe and masking paper the 18 inches or so below it. Three coats of forest green Top Coat 501 took little time to spray while allowing about an hour between coats for the paint to flash.
OH NO! DO IT AGAIN
Having already painted the decks and spars, when I came back the next morning to remove the masking, I could see that the job was not what it could be. I got on the phone with Alex Sandas of Alexseal (not “the” Alex). He reminded me that the high temperatures we were experiencing called for a slow reducer that allows the paint to flow a little bit longer before it flashes. “But not to worry, spraying 501 on top of sanded 501 is the truly deluxe paint job.”
Alex decided to make a stop in Colorado that week to coach me on. Before he arrived, I DA-sanded the hull again with 320 grit and replaced all the masking with clean tape and plastic. At 5:30am on July 2nd, we returned to the scene of the crime, as criminals tend to do. First, Alex showed me how to really tune my spray gun and demonstrated on the first few feet of the transom. Under his watchful eye, I sprayed the final two coats. To get the ultimate in glossy finishes, we wanted to spray “on the hairy edge” of letting the paint run. Of course, I left a few runs. Enough on the transom and port quarter that I felt compelled to sand that part out and spray it again the next week. Any other smaller runs or flies that decided the paint was so beautiful that they had to end their lives right then and there were rubbed out with a Meguiars 2000-grit sanding block followed by a quick buffing with a medium compound, and finally a polishing compound. It is worth mentioning that Alexseal is unique in that the other well-known aliphatic polyurethane marine paints cannot be sanded and buffed this way since their pigment does not run completely through the top coat. In fact, their warranties are voided if you do, whereas the Alexseal maintenance procedures detail this repair method.
A few evenings later, I masked off the boot stripe area using the sanded stripe as a guide and sprayed three coats of Topcoat 501 to a green mirror finish. My girls decided there would never again be a wait on board to get into the head as they could get in the dinghy and use the hull as their mirror for putting on makeup. Posting the pictures on my Facebook page elicited any number of “OMG—that’s beautiful” comments. After more than 200 hours of loving work and faith, those OMGs were the ones we were truly after.
 BWS is following Pete and Jill Dubler’s refit and restoration of their Pearson 424, Regina Oceani, on the hard in Fort Collins, CO. Pete emphasizes that doing the work yourself creates intimacy and familiarity with her systems and a special pride that writing checks just can’t offer.
Caution: Before beginning any project in a boatyard or marina, check with local authorities about environmental rules and regulations!
Two-Part Polyurethane Topside Paints
While Pete worked exclusively with Alexseal (www.alexseal.com), there are several other well-known brands of linear aliphatic polyurethane coatings that can do the job.
Awlgrip has been an industry standard for many years and offers two-part linear polyurethanes and Awlcraft Acrylic Urethane topcoats. More boats have probably been painted with Awlgrip than any other brand. www.awlgrip.com
Sterling, a division of Detco, has been producing high-gloss marine coatings for 30 years. Their two-part linear polyurethanes pioneered the super glossy “wet look” that is so popular today. www.detcomarine.com
Interlux Perfection is an easy-to-use, two-part polyurethane coating suitable for amateur spraying or rolling and tipping. It is backed up by the world’s largest coating and paint company. www.yachtpaint.com
System Three offers unique, water-based WR-LPU linear polyurethane coatings that are more eco-friendly than solvent-based paints. The coatings are hard, glossy and easy to apply. www.systemthree.com