


How I upgraded our dodger with the generous help of friends and fellow cruisers (published January 2015)
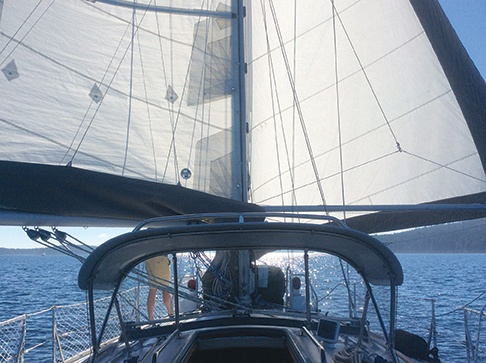
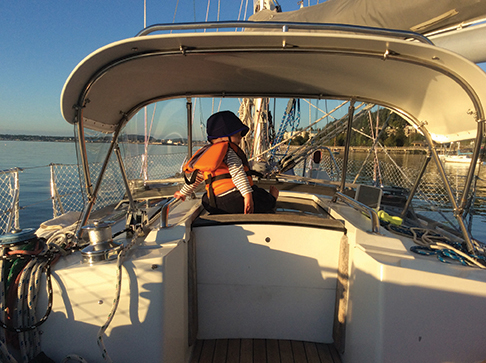
While sailing close hauled into a steep chop created by a strong northeasterly breeze that was greeted by a north running current, waves crashed aboard and quickly met the windshield of our new dodger. This was the moment I had been waiting for.
We were crossing Rosario Strait just east of the San Juan Islands durting a fall storm and seas were shipping aboard one after another. As Jill and I sat in the lee of our new dodger, we watched as waves and spray hit the windshield, rolled off onto the deck and disappeared over the gunnel, leaving everything underneath and behind it dry, including us. “Success!” I thought with a sense of pride. Our new dodger had passed its first major test.
When we bought our Grand Soleil 39 Yahtzee a few years ago, I knew that the old, Pacific Blue dodger she was wearing was not long for the world. I didn’t know how experienced it truly was, but it had just completed a Pacific circle so had quite a few blue water miles under its belt and had spent a good amount of time sunbathing in the tropics. The end was easy to predict. We salvaged it as long as we could and when water started to leak through the fabric on top, the yellowed windows cracked and the zippers disintegrated in our hands, we took it off and sacrificed it to the green compacting dumpster in the marina parking lot.
We then cruised a full year in the Pacific Northwest with no dodger. Of course, spring, summer and fall weren’t too bad, but when the bite of winter winds and sea spray swept over the deck, we knew that having a quality dodger was key to our comfort, and ultimately safety.
Not wanting to spend another winter cruising the PNW without a dodger, and looking to improve on our previous dodger’s shortcomings, I set out to make my own.
THE DESIGN PHASE
Our reasons for going so long without a suitable replacement for our old dodger really came down to two main factors: 1) The high cost of having an outside vendor construct a new one; and 2) the fact that I wasn’t content to just go with the same old design and build—or similar—that led to the demise of our aforementioned blue rag with windows.
Having sailed on many boats with various types of dodgers in the tropics and colder latitudes, I had collected a wealth of information about what I did and did not like about certain models and the materials used to build them. Also, I am by no means competent with a sewing machine and could not stomach taking the time and effort to build or pay for a new dodger only to watch it slowly degrade in front of my eyes, no matter how much preventive care and maintenance I did. In essence, I was looking for something that I could build by myself with materials that would have a longer lifespan while still being functional and looking good.
The final tipping point that led me to building my own hard dodger came as a result of a conversation with a friend and fellow cruiser, CB, who was temporarily back in Seattle from his boat in Central America. Perched atop dock boxes drinking cold beers one evening, I picked CB’s brain about how he solved his old canvas dodger problem before heading off cruising. He explained how he had used King StarBoard® and his existing dodger frame to make a hardtop that he had then hired a marine canvas professional to build the windshield and side curtains for.
Being an engineer, he was meticulous in his design and build so I knew he was on to something. Plus, he was happy to report that after circumnavigating Vancouver Island, sailing down the West Coast to Mexico and then to Central America that the hardtop had exceeded all of his expectations and that he didn’t think it would ever wear out—and if it did he would build the exact same thing again. I was sold on the top, but what of the windshield?
From this initial conversation and the overall look of our existing stainless steel frame, I started to design what would end up being our new dodger. Many back-of-the-napkin sketches got me on the right track for what the overall appearance of the dodger and hardtop would be; I just needed to figure out how I was going to create a solid windshield without using canvas. I was adamant about having a fully clear but durable windshield because I absolutely loathed the dreadful sightlines from the helm that our old dodger—and many canvas dodgers—had built into it. I’m still at a loss for why this is acceptable.
Living at the time in a marina filled with experienced cruisers, I looked no further than down D-Dock to my friend Karl’s unique 70-foot wood ketch that had a rigid, clear enclosure that he had built himself. Karl is a marine carpenter with 30 years experience working on offshore quality boats, so I knew bouncing ideas off him would be key to not only making the windshield structurally sound, but also to making it look good.
My initial thought was to use Lexan or something similar, and Karl confirmed I was on the right path while giving me tips and later lending me tools to execute the build. He also pointed me in the direction of Charlie at Clear Cut Plastics in Seattle, and it was there that I found nearly everything I was looking for: Dolphin Gray King StarBoard® for the hardtop and a durable, UV resistant and shatterproof clear polycarbonate called Makrolon® for the windshield. With the design in mind and materials in hand, I was finally ready to build.
THE BUILD PHASE
A few nights before getting ready to start on the hardtop we had friends over for dinner who own a boat just a few slips from where we lived. Mike is a professional carpenter and when I explained what I was up to over the weekend, he offered to lend a hand and some of the necessary tools to complete the job. For his help, I would later do a rig inspection and splice all of his new halyards. That’s a great cruisers’ trade!
The Hardtop: Mike and I found out very quickly that building the hardtop efficiently was a two-man job. All the cutting, lifting, tracing and measuring were made far easier, but it was also attention to detail that was greatly improved as we developed an impromptu set of checks and balances to make sure things were done right.
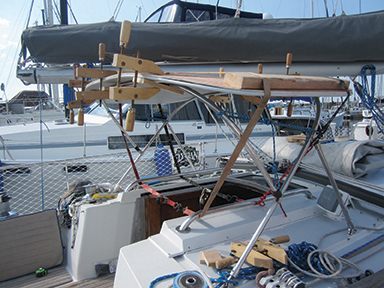
We started off by making sure the original 7/8-inch stainless steel frame was square and symmetrical over the companionway. It was a little bit tall before, so I used a handheld stainless steel tubing cutter to trim off a few inches of the legs to achieve the right height. I then hoisted the mainsail and trimmed it in as I would when sailing close hauled to make sure the boom wouldn’t rest on the hardtop. Also, while grinding the halyard we were able to check that winch handles would clear the frame as well.
In order to get the hardtop as close to perfect as possible on the first try, we started by making a template out of a big sheet of 1/8-inch underlayment that I got at Home Depot. We laid the underlayment on top of the frame and clamped it in the middle before bending it around the sides with ratchet straps. From there, we traced the corners by bending a batten so we could achieve a symmetrical, curved edge on each side. As far as design goes, I wanted to curve the leading edge forward but could only go so far because of the mainsheet.
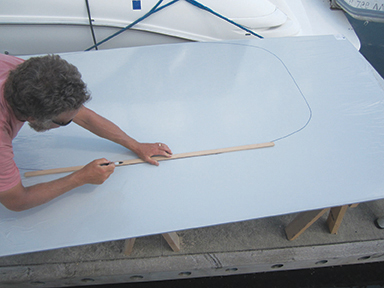
After tracing the shape of the top on the underlayment, we took it off the frame and cut it to shape. Then back on the frame it went for a final test bend to see how it looked. We had to tweak it just a bit to get the aesthetic right, but were happy with the overall appearance and shape.
Next, we laid the template on top of the 4X8 sheet of StarBoard®, traced it and cut it out. We made the cuts using a circular saw for the straight runs and a jigsaw for the corners. Predictably, this left a rather sharp edge all the way around that certainly wouldn’t have been user-friendly, so we ran a router on both sides to round it off and smooth it out.
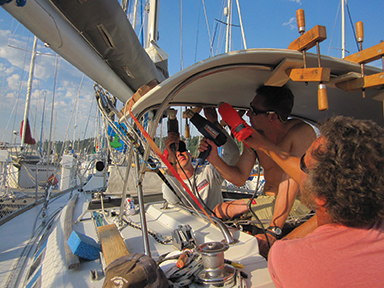
Just like we had done with the template, we lifted the StarBoard® on top of the frame, clamped it in the middle and used the ratchet straps to bend it around the sides of the tubing. In order to effectively bend the sides around the frame, we had to heat up the StarBoard® enough for it to become pliable. So, using three heat guns, Mike and I, along with my neighbor Trey, sat under the top and applied constant, even heat to one side at a time. As we applied heat, we were slowly able to tighten down on the ratchet straps until the sides collapsed around the frame. This took some time and patience, but in the end it happened quicker and easier than any of us anticipated.
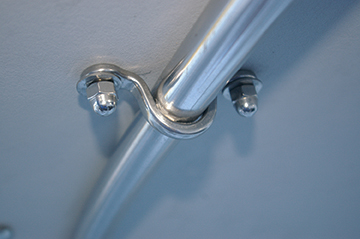
We left the ratchet straps on overnight to keep the bend in place and the next morning found a near perfect curve had been achieved. With the curved StarBoard® now in place, we needed a way to attach it securely to the frame. I went back and forth on how I was going to accomplish this and quickly decided against drilling through the frame. Instead, I found stainless steel Ronstan straps at West Marine that fit perfectly flush over the 7/8-inch tubing and used eight of them, along with carriage bolts and acorn nuts to bolt the top to the frame.
We attached the top to the front edge of the frame first then adjusted the aft piece of tubing to give it a slight angle forward. I did this to ensure water would run forward off the top onto the windshield and so that the aft edge was slightly higher, making it less likely to hit your head when ducking below or coming out from underneath the dodger.
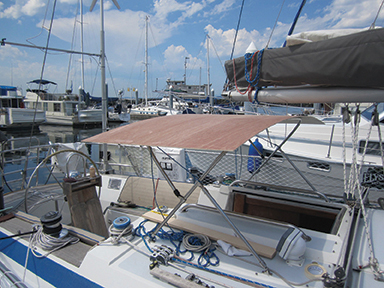
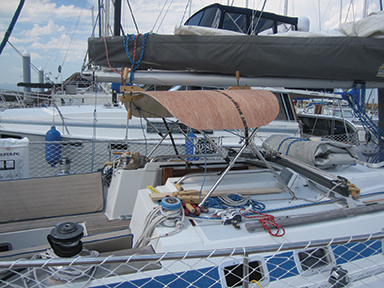
The final additions to the hardtop were stainless steel grab rails that I attached to the sides and aft edge. These have proven useful numerous times already and I wouldn’t consider building or buying a dodger without them.
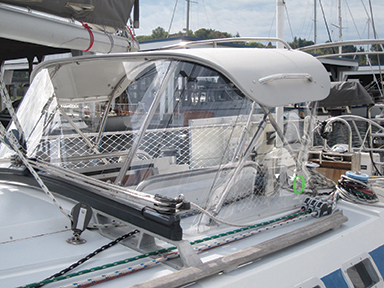
With the hardtop finished and looking great, it was time to turn my attention to what was surely going to be a more difficult project, the windshield.
The Windshield: This is where things got tricky. I was adamant about making my windshield out of durable polycarbonate all the way around, but going CB’s route of hiring someone to make the sides would surely be an excellent way to finish this project. Rest assured, if you go the polycarbonate route, the process and overall product is going to be very custom to the curve of your hardtop and the intricacies of the deck below it.
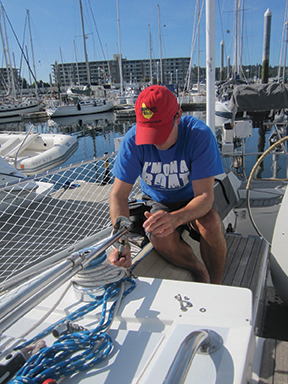
Before starting on the windshield, I added two one-inch diameter stainless steel forward struts to the frame to make it more robust and to give the clear plastic a place to attach at its forward bottom edge.
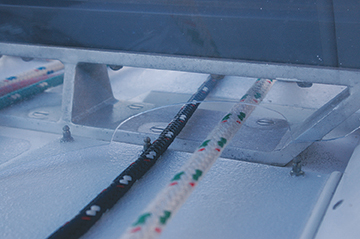
Knowing that I needed a durable and watertight way to affix the 1/8-inch Makrolon® polycarbonate to the underside of the dodger, I found vinyl tracking from Sailrite that is made for boltrope type material. Designed for outdoor use, the split in the track was a near perfect fit for the edge I was working with and it was pliable enough to shape around the curves I had created by bending the top onto the frame. Using 1/4-inch stainless steel screws and fender washers, I simply drilled through the vinyl flange of the track and into the StarBoard® at six-inch intervals.
When it came time to actually cut the Makrolon® for the windshield, my initial thought was to cutout one big piece that I would then be able to bend in place and fit into the track. But because of the bends and corners created when we molded the top to the frame, this quickly proved to be a false way of making it happen. Instead, and after much deliberation, I cut the windshield into five pieces: two sides, two rounded corners and a large middle section.
I made templates for each individual piece and measured, cut and fit the sides and middle sections first. The rounded corners were more difficult to get just right and one of them needed a cutout for our mainsheet and cunningham to run back through. Using cardboard, Mike and I were able to make a mockup of each corner that we then cut with a jigsaw and fit up into the track.
Because the windshield was cut into five sections, I then needed to figure out a way to keep the joints watertight. To do this, I flanged the middle section of the windshield over the forward, inboard edge of the corners and the aft edge of the corners over the sides. I used stainless steel rivets to fasten all the sections to one another and stainless steel straps to attach the sides and front to the dodger frame.
Our previous dodger was connected to the deck using quick snap fasteners and I had planned to connect the bottom edge of the windshield using these existing holes. But once I got the windshield finished I found no real need to do this, as water can’t get underneath at those spots anyway and it would just mean more holes in the polycarbonate. To finish the raw edges of the Makrolon® at the bottom and aft edges of the sides, I purchased clear car door edge guards from an auto parts store and cut and fitted the pieces where necessary.
Though the overall build is done, I am still planning to add a solar panel to the top and would like to install red and white LED lights underneath that will shine down into the companionway. Also, in my initial design, I had wanted to build the center section of the windshield so that it could open to allow air to flow through the cockpit. So far we haven’t needed this and have options still available to make it happen should I want to.
THE RESULTS
In the end I couldn’t be happier with how the dodger turned out. It has truly exceeded my expectations in both look and functionality and it seems that my overall goal of trying to break the cycle of canvas dodger attrition—buy an expensive dodger, sacrifice it to the elements, replace—has been achieved.
The StarBoard® top is very durable and by all accounts will last far longer in any environment than canvas. It was easy to work with and I have since used the scraps on several other projects around the boat.
Going with the Makrolon® windshield was absolutely the right call, though it was a bit more costly than some lower grade Lexan materials. Charlie at Clear Cut was helpful in making this decision and was confident in the durability of the Makrolon®—it has been used regularly on windshields for commercial fishing vessels heading to the Bering Sea, which is saying something.
When the windshield was finally installed and we pulled the protective film off it, I was incredibly impressed, and remain so, with how clear it is. It is so clear, in fact, that at times it looks as though nothing is there. It is watertight, sheds water quickly, doesn’t collect dust or residue and is easy to keep clean. That it has a 10-year warranty from yellowing was a big selling point for me, too, which was one of the greatest deficiencies of our old dodger and so many others.
 The overall design and build of the dodger was by no means a simple task, so credit is definitely due to those who make them for a living. That being said, we ended up spending $1,300 for all the materials and it took about four days to complete in total. Of course, I am eternally grateful to the many friends who helped me along the way and certainly don’t believe it would have turned out as well as it did without them. And if they ever choose to make one of their own, I’ll be first in line to lend a hand.
Tools Used:
– Three heat guns
– Two ratchet straps
– Rivet gun
– Handheld stainless steel tubing cutter
– Belt sander
– Portable router
– Circular saw
– Jigsaw
– Drill
– Various wrenches, screwdrivers, drill bits and saw blades
Parts List:
– Existing 7/8-inch stainless steel dodger frame
– New 1-inch stainless steel tubing and fittings for forward struts
– 4X8-foot piece of 1/2-inch Dolphin Gray King Star
Board® marine grade high-density polyethylene for hardtop
– 4X8-foot piece of 1/8-inch Makrolon® UV
polycarbonate for windshield (UV and scratch resistant,
shatterproof, 10-year warranty against yellowing)
– 4X8-foot piece of 1/8-inch underlayment from Home Depot
– Twelve Ronstan stainless steel straps to hold the top and wind
shield to the frame
– Keder Rail Track from Sailrite for windshield to fit into the
underside of the hardtop
– Two 18-inch handrails from West Marine
– One 48-inch handrail from West Marine
– Clear car door edge guard for the raw edges of the windshield
– Various fasteners including carriage bolts, acorn nuts, self-
taping screws, washers and rivets