


Over the years, and much experimentation, I have adopted two regular galley activities that not only keep meals interesting but, most importantly, give our diets a healthy boost; sprouting and yogurt making (published April 2016)
I am always searching for ways to expand and enrich the menu onboard while keeping pre-packaged and preservative laden foods used to a minimum. I like methods that don’t require a lot of equipment, ingredients or time but deliver nutritious and delicious results. Sprouting seeds or beans and fermenting yogurt are both methods of food production that have been around for hundreds, and maybe, thousands of years.
The ancient Chinese discovered the delicious mung bean sprout and to this day is still a staple in Chinese cuisine. Yogurt has become popular in North America only over the last few decades but has been used as a way to preserve milk throughout Eastern Europe and the Middle East for centuries. Both sprouting and yogurt unlock a host of nutritional benefits that lay dormant in the simple, everyday foods they transform.

READY, SET, GROW!
Everyone knows that pulses (dried peas, lentils and beans) are a great low fat way to add fiber to your diet. Sprouting those same beans and seeds is not only a way to add crunch and greens to sandwiches and salads, it transforms their nutritional profile unlocking proteins, and altering mineral and vitamin content. Pulses, beans and seeds are nature’s amazing way to package everything needed to grow a whole new plant, and sprouting is creating the right environment for that plant to wake up and start growing.
Growing sprouts doesn’t require any fancy equipment; you can start with a regular glass jar and some seeds if you want to try it out. However after several years of growing sprouts myself I find that purpose made sprouting trays often produce a better crop. A $20-30 investment will buy a set up that will allow you to grow fresh, healthy greens all year round and will only take up a small amount of counter space. The method for sprouting any type of seeds is simple as 1, 2, 3.

1. SOAK YOUR SEEDS—To encourage a seed or bean to sprout, or germinate, it is necessary to soak them in clean water. Measure out just enough seeds or beans to cover your sprouting tray without crowding, or if using a quart sized jar two to four tablespoons depending on the size of seeds. Place them in a bowl and cover with at least one inch of water and let soak for eight to 12 hours or overnight.
2. RINSE AND DRAIN—After the seeds are hydrated and look plump, drain well and distribute evenly in sprouting tray and place in a cool, dark corner. When using a jar to sprout, cover the opening with a piece of fine mesh or a couple of layers of cheesecloth, drain well, trying to turn the jar so seeds stick to the sides. Store the jar in a cool, dim place on a slight angle with the opening low so any excess water can drain out.
3. WASH DAILY—Two or three times each day, depending on how hot it is on board, wash the seeds with clean water and drain well. Place the sprouting tray or jar back in your cool, dim sprout spot.
Within a day or so you should start to see a small “tail” emerge from each seed/bean which will continue to grow and form a small leaf. Sprouts will be ready to eat in three to five days depending on the seeds used and the temperature and humidity onboard. When sprouts have reached the desired size you can green them up by placing in indirect sun for a few hours. Then it is time to enjoy or refrigerate for up to a week.
From radish, broccoli and alfalfa seeds, to lentils, chickpeas, mung beans and new varieties of microgreens there are lots of seeds and beans available for sprouting. The dried seeds and beans will keep for several months in an airtight container and many like lentils and mung beans can also be cooked and eaten without sprouting.
Sprouting is fun, affordable and a delicious way to add variety to your meal plan, so don’t be afraid to experiment. It is also a great way to get kids involved in the galley and can be used as part of a “boat school” science program. Putting them in charge of checking on and watering the sprouts each day will teach about seed germination and photosynthesis while they literally watch their food grow!

GET SOME CULTURE
The live bacterial cultures found in fermented foods such as yogurt are essential to maintaining a healthy gut. They not only help with digestion but they are also thought to boost our immune system. Finding good quality yogurt in places that have limited refrigeration is nearly impossible but that doesn’t mean you have to forget about this healthy treat. Making yogurt on board is not only easy, it is very inexpensive.
Yogurt is a simply a combination of milk and specific live bacterial culture. The culture, sometimes referred to as a starter, feeds on the naturally occurring sugars in the milk and converts it into a semi solid that has a pleasant tangy flavor. The bacterial cultures that react with the milk are temperature sensitive, so the only tricky part about making yogurt is keeping the mixture at a constant warm temperature long enough for them to do their magic.
The bacterial cultures needed to make yogurt are sold freeze dried, either on their own or premixed with powdered milk. The premixed formulas are popular and sold worldwide as they are shelf-stable, require no refrigeration and come in a variety of flavors. The only additional ingredient needed to make yogurt using this method is clean water. If you purchase a separate bacteria culture from a specialty supplier it will need to be kept in the fridge or freezer once opened, but it takes up very little space as only a few grains are needed to produce a batch of yogurt.
However, using this method means you must also buy and store milk. Some freeze dried cultures have even been developed to work with soy milk and coconut cream for people with dairy intolerances. Live bacteria cultures are also found in ready-made yogurt, either commercially made natural yogurt or the last of a previous batch, perhaps made by a neighboring boat. All you need is a couple of spoonfulls.
Most people would assume that fresh milk is needed to make yogurt onboard, and certainly it is preferred. But fresh milk is not only hard to store, it must be refrigerated and is often hard to find. Fear not, I have been making lovely yogurt for years using long life, or UHT (Ultra Heat Treated) milk, and have even used powdered milk with equally good results. Being able to use shelf-stable milk allows me to have fresh yogurt anywhere, anytime, even while on a three week blue water passage.
No matter what ingredients you use to make yogurt onboard the equipment is the same. When heating the milk you’ll need a heavy bottomed pot, a spoon and a thermometer to make sure it reaches the correct temperature. After adding the culture, or starter, you need a container large enough to hold the entire mixture, usually about one liter. The container then needs to be kept warm for several hours so that the bacteria culture can thrive; too hot and the bacteria will die, too cold and they will not activate. There are fancy yogurt makers on the market but a couple of thick towels or an insulated cooler will do the job. You can also use a thermos to keep the yogurt warm while it ferments.
The milk, or water and a pre-mixed package, should be heated gently to about 43 Celcius, or 109 Fahrenheit. When the milk reaches the correct temperature, add the bacterial culture, or starter, and mix thoroughly. If you heat your milk higher than this by mistake simply turn off the heat and wait for the milk to cool before adding the culture. When using a pre-mixed yogurt package and water, you must pay careful attention when your mixture is on the stove. Overheating can kill the cultures already present in the mixture and fermentation will not occur.
A large glass jar with a sturdy screw on top is easiest to use to ferment, or incubate, the yogurt. Using glass ensures you don’t have to worry about chemical leaching that can happen with plastics and they are easy to clean. Whatever container you use to incubate in it is a good idea to pre-heat it by filling it with boiling water. This will help to avoid maximum heat loss when the milk/culture mixture is added. After the container is filled and capped wrap it tightly in towels and place it in a warm place where it can be left undisturbed for several hours.
Yogurt will take four to eight hours to ferment, depending on how well it is insulated. When ready you should be able to rest a spoon momentarily on the top of the now semi solid yogurt. Place the finished yogurt in the refrigerator where it will firm up a little more and keep for five to seven days.
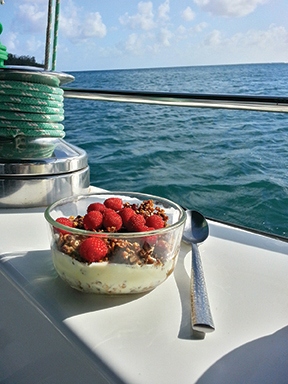
Enjoy yogurt for breakfast on its own or mixed with muesli, it can be made into savory dips for crudités or sweetened with honey for dunking fruit slices. You can even make cheese by hanging yogurt wrapped in fine cheesecloth over a bowl for several hours. The excess liquid will slowly drain off and you will be left with a thick, tangy spread that can be used in place of cream cheese or sour cream. However you eat your yogurt, don’t forget to save a little for your next batch.

Using simple equipment and easy to find ingredients you can make wholesome, healthy additions to your meals aboard, at anchor or at sea. Yogurt making and sprouting are two low cost ways to add big nutritional value to your diet, so why not get started today?
Heather Francis is originally from Nova Scotia, Canada but has lived and worked on the ocean for over a decade. She has cooked professionally on land and on boats. These days you’ll find her in the galley of Kate, the 41 foot sloop she and her Aussie partner Steve have been sailing since 2008. For more stories, photos and recipes log onto www.yachtkate.com
SPROUT FACTS
The United Nations has declared 2016 “Year of the Pulse.” There is a worldwide challenge to eat pulses at least once a week this year, why not join by starting some homegrown pulse sprouts! Check out www.pulsepledge.com, www.iyp2016.org for more info.
Spoiled sprouts? Overcrowding sprout trays will cause seeds to rot and too much water can make them ferment. Make sure seeds have good airflow and are properly drained.
To reap the maximum nutritional value of your crop eat sprouts raw, heating will diminish their vitamin punch.
YOGURT FACTS
Wanna spice up your yogurt? Try adding a cinnamon stick, whole star anise, a pinch of saffron or a spoon of instant coffee to the milk while it is being heated.
If your yogurt doesn’t set no need to throw out the batch; gently reheat, add a little more starter and try a new method of insulation. Chances are you’ll end up with firm, tasty yogurt second time around.
There is a wealth of information, forums and groups about sprouting and yogurt making on the web. Check out www.wildfermentation.com and www.sproutpeople.org to start.