


Modern plastic technology meets classic plastic boat-less maintenance on deck, less corrosion below (published February 2013)
Mr. McGuire: “I want to say one word to you. Just one word.”
Benjamin: “Yes, sir.”
Mr. McGuire: “Are you listening?”
Benjamin: “Yes, I am.”
Mr. McGuire: “Plastics.”
It’s been a few years since those memorable words of The Graduate in 1967, but plastics have truly come of age for boating and now are without a doubt a viable and advantaged replacement for expensive, heavy, corroding bronze plumbing or high maintenance teak on deck. While lightening our Pearson 424 project boat, S/V Regina Oceani, has not been a primary objective, reducing upkeep labor certainly has been.
“Sand or sail” was an admonition of a dock mate several years ago. Great, but his boat looked like it had been through hell and should have been left there. His idea was right, but his implementation was a bit lacking. I managed to convince myself that I could replace the teak on deck with plastic substitutes; lessening maintenance (and costs over time) while not compromising appearance and perhaps even enhancing the Queen’s looks.
Over several months I collected samples of all sorts of teak substitutes. These ran from thin cabin sole sheet flooring materials to 2” thick extruded high-density plastics. There were many interpretations of “teak” color, from dark browns to light oranges. Eventually I settled on a few products, all for use on deck, sticking with true teak below deck. All sea valves and associated plumbing were replaced with Forespar Marelon components. We’ll cover all these improvements here.
START SMALL—BUT SAVE BIG ON LABOR

First to go was the teak around the coaming top. This teak was particularly difficult to maintain, as varnish or Cetol has to be applied around all of the winches, cleats and fittings. The only way to get it to really look good was to remove all the hardware before refinishing, which was on the list of jobs that never got done.
I turned to Bill Gribble at PlasTEAK, Inc. for assistance in designing and laying out the new coaming top to be made from PlasDECK. He explained that the entire U-shaped area could be covered with a single continuous piece of the material that would be fused (welded) together in his shop out of individual strips of teak-colored plastic with eye-pleasing imitation black or white caulk lines.
We started by exchanging a few photos and drawings. Next, I secured some thick plastic sheeting from a local craft store to create a full-scale pattern of the area to be covered. Three sections of plastic were taped down to the coaming by cutting out triangles in the sheet and taping the plastic down using the gaps in the plastic. Then, a few long straight lines and several hash marks between sheets were drawn with a Sharpie marker to create a set of references for reassembling the sheets later at the PlasTEAK shop. Dashed lines were drawn to show the intended edges of the future PlasDECK material. Holes were similarly illustrated. The plastic was then rolled up and mailed off to PlasTEAK in Ohio.
About 10 days later, an 18” high, 15” diameter cardboard drum arrived with the entire single sheet of PlasTEAK rolled up inside. A few sausages of white adhesive caulk and a standard caulking tube of trim caulk also came in the kit.
Referencing a centerline on the transom, I spread the adhesive with a toothed trowel and laid the material out from that line—first to starboard and then to port. A laminate roller was used to firmly level the material and secure the bond. Any excess adhesive was easily removed with denatured alcohol. Finally, the edge was caulked with a narrow bead to provide a finished look. Deck hardware mounts right on top of the PlasTEAK and it all looks quite Bristol when done… never to seek any varnish.
GOING 3D, GOING BIG
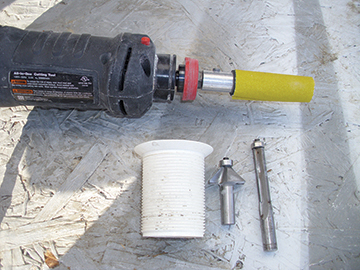
At this point I became very bullish on plastics. I secured some ¾” thick brown Polywood and replaced my teak deck handles by pattern routing an identical set. Hole plugs were made using a 7/16” plug drill from the local home center. The “grain” of this material is restored after router cutting by running a propane torch flame slowly over the surface. Amazing!
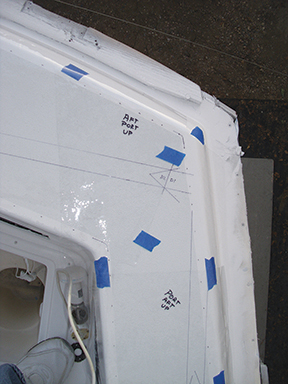
The really big bet on plastic came when the toe rails were replaced with 1” thick, 6” wide PlasTEAK. This material is extruded so it has a consistent density throughout, unlike the foamed plastics used for plastic home decking wood substitutes. This consistency is important when you have to cut and form the material to the curves of the boat or to form moldings as I did for the mounting of the stainless rub rail at the toe rail.

To sculpt the PlasTEAK to match the curve of the hull, I made patterns of ½” MDF (medium density fiber board) from the home center cut into 6’ x 6” pieces. After mounting the molding to the side of the boat with stainless truss head sheet metal screws in sunken holes, I screwed each sheet of patterning board in turn to the gunwale and routed the outside curve to match. I then duplicated that curve in a parallel fashion on the inside edge, cutting that out with a saber saw and smoothing with sandpaper after removing the template from the boat. Another template fashioned from a scrap of high density plastic was used to pattern the scarf joints. Once all of the templates were in place on one side, I cut each toe rail piece from the PlasTEAK, first roughly with a saber saw and then precisely with a bottom bearing router bit, following the MDF pattern clamped to the plastic stock.
A strip of cut-off plastic was drilled at regular intervals to form the pattern for the two rows of screw holes for securing the PlasTEAK to the gunwale with a polyurethane adhesive. Before gluing, the PlasTEAK was “activated” for the adhesive by running a propane torch flame thoroughly over its bottom and ends. The edges were then formed with a round-over bit on the router. Finally, the holes were plugged and sanded flush with the orbital sander using 80-grit paper, largely disappearing from view. The scarf joints were masked off and filled most of the way with round gap-filling foam from the insulation department of the home center and then topped off proudly with the polyurethane adhesive. A bit of water misted over the adhesive speeds its curing. A day or two later the proud adhesive was sanded flush with the orbital sander. Low and behold, only one set of templates was needed as the other side of the boat used the same curve—just flip the patterns over.
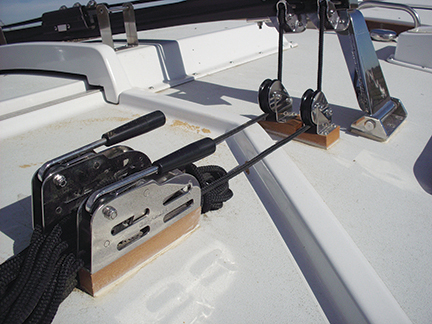
Some 2” x 6” PlasTEAK was used for the blocking under the windlass. Scraps of PlasTeak and PolyWood were used for various blocking under turning blocks, foot blocks, and line clutches. Even the teak trim around the coaming boxes and companionway was replaced with PolyWood. These materials are easy to machine to any shape needed with either woodworking or metalworking tools.
GOING LESS GREEN (GREEN BRONZE, THAT IS)
The other place where plastic products played a large part in our project was in the plumbing department. Our boat has an amazing 15 sea valves and thruhulls near or below the waterline—and that doesn’t count all of the output thruhulls in the transom! All of these fittings and their accompanying strainers, valves and most of the plumbing fittings were replaced with Forespar Marelon fittings. That was well over 100 pounds of bronze. Marelon is an amazingly strong composite-reinforced polymer. The sea valve system is UL and ABYC approved, won’t corrode, and is not subject to electrolysis, so no grounding of the fittings is required (amazing how much wire goes into a bonding system).
I used the “93” Series of OEM valves, which I ordered directly from Forespar. Art Bandy, a.k.a. “Mr. Marelon,” talked me through the configuration of the valves. They can be configured in a wide variety of forms, with top or side outputs and even with one or two barbs on each valve. The dual barb configurations can be either dual output or flushing—one of the barbs becomes the input for a flushing line when the valve handle is in the correct position. The relationship of the location of the handle to a side output can be specified so you can configure all of your valves to close with exactly the same valve handle action—in my case, down and towards the center of the boat. All of these valves are available in size diameters from ½” up through 2”. Threaded outputs instead of barbs are also available. The thruhull itself can be one of four types: mushroom, flush, mushroom screened, or flush screened. Scoops are also available. The number of unique configurations must be astronomical.
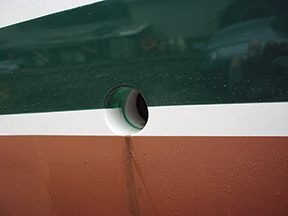
Since I was refinishing the hull, this was a great opportunity to switch from mushroom-headed thruhulls to flush ones. While I am not expecting any huge speed gains, for all of the at- or above-waterline penetrations, a flush hole sure does look “yacht-like.” To remove the old fittings, I ground off the bronze mushroom heads with an angle grinder and then pushed the valves into the boat. (Well, actually it took a little pushing and pulling, prying and groaning, but they all came out in a day’s work).
Doughnuts of 4/4 white oak were fashioned back in the woodshop and sealed with several coats of epoxy. These mounting pads were installed to the cleaned inner hull using a Cabosil-thickened epoxy. A piece of dowel on the inside and out and a bit of string formed an easy to install and tighten clamp to hold the blocks in place while the epoxy cured.
Each of the holes was resized to fit the Marelon thruhull using a straight patterning bit on the router from the outside with the inner diameter of the mounting blocks as the guide. The edge of each hole was then ground to 45 degrees with a router bit, again using the inside of the mounting block as the guide. This allowed the flush thruhulls to lay slightly recessed from the surface of the hull, providing space for polyurethane sealant.
After dry assembling each sea valve/thruhull and marking the resultant position of each thruhull on the hull, I tightened the valves on the inside of the boat while an assistant held the gooped-up thruhull in place, preventing rotation by using a piece of aluminum plate that I cut to fit the notches in each of the various sizes of thruhull. Lots of disposable gloves were sacrificed for the cause. A few screws into the oak blocks secured each valve from further rotating. One week later, the excess sealant was trimmed off and the thruhull sanded roughly flush to the hull. The hull was then faired with Alexseal fairing compound, as the rest of the hull was faired and finished. As you can see, the result is a clean and professional-looking simple round hole instead of the normal mushroom head.
Back inside the boat, five of the sea valves (engine, generator, watermaker/airconditioning, refrigeration and deck wash) had their own Marelon strainers. On the output of each strainer, a Marelon valve was installed so the strainer could be cleaned without any backflow of water into the bilge. The result is quite the conglomeration of plumbing, but at the end of the day, each system is pretty straightforward and easy to understand. I know I won’t miss rebuilding bronze sea valves and I sure do look forward to more sailing and less sanding in my future.
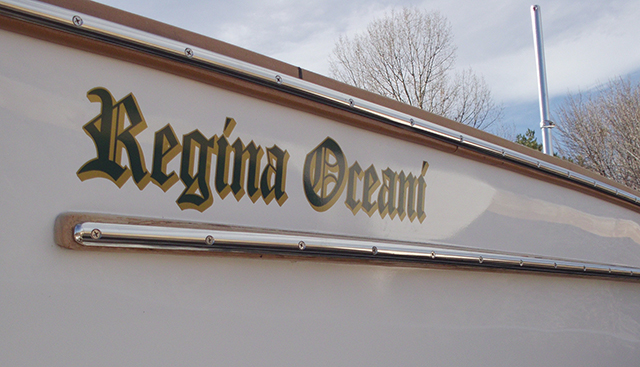
BWS is following Pete and Jill Dubler’s refit and restoration of their Pearson 424, Regina Oceani, on the hard in Fort Collins, Colorado. Pete emphasizes that doing the work yourself creates intimacy and familiarity with her systems and a special pride in your boat that writing checks just can’t offer.