


Part II: Installation tips for the faint of heart (published September 2014)
So you have done the research, studied the brochures, completed a dozen electrical needs analysis surveys—the complexity of which would have made Einstein weep—and endured hours of haranguing advise from salespeople, friends, relatives and total strangers in dubious Internet chat forums. Despite all these obstacles (and having been labeled a fossil fuel dependent planet killer for good measure), you have successfully jumped through the numerous rings of fire, made a decision and bought a marine generator. So far so good, but how to get the thing installed with the best chance of having it work as advertised?
The first thing to consider is the location of the unit, however, being a diligent buyer meant careful measurements and planning went into this decision of course, so you know it is going to fit. That’s all well and good, but a little optimism or can do attitude, while admirable, has a way of altering a tape measure. These alterations in graduation can range from insignificant to disastrous and are applicable to both imperial and metric systems.
Perseverance will triumph, but careful, realistic expectations at this stage of the process will forever influence the future generator experience. It also may represent a significant financial investment on the resale value of your vessel. Assuming you have bought a traditional, heat exchanged freshwater cooled marine generator (smart move), you will require certain standard items for installation. Seawater in to cool the unit via a strainer, exhaust and water out via a muffler, fuel in through a primary and secondary filter and fuel return line, amongst others.
LOCATION, LOCATION
The level of the generator is imperative for long life, or any life at all for that matter. A major problem for generators (and primary engines also) is back filling with seawater from the exhaust. This is a sure way to destroy a diesel and is one of the most common problems that can be easily avoided with a correct installation. (See the sidebar for how to recognize and hopefully recover from this nasty event.)
There are various recommendations for different manufacturers regarding levels, and the specifications should be followed at a minimum.
HEAT EXCHANGER
This works like a car radiator and is where the fresh water coolant that circulates through the engine is cooled. Where a car uses a fan to cool the fresh water, marine units use a seawater flow that is restricted to the heat exchanger to cool the hot fluid circulating around the motor. This is quite efficient, as water does a better job than air of transferring heat by a large margin: conduction rather than convection perhaps? The corrosive salt water is restricted to the heat exchanger, which in better units is constructed of highly corrosion resistant materials such as cuprous nickel or such and will be designed in a way to make removal for cleaning easy. This is where those pieces of impeller from the seawater pump will end up when you neglect to change it every 300 hours or so. This and other blockages will cause the machine to overheat due to reduced water flow.
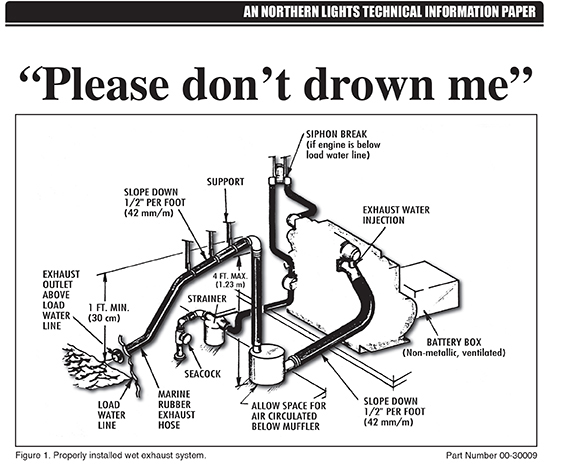
However, the basic rationale goes like this. When the engine is running the exhaust gases get mixed with the cooling seawater that has passed through the heat exchanger. These gases force water trapped in the muffler or waterlock, or both, up the exhaust hose and over the side. Various options are available in exhaust requirements but essentially if the exhaust water can run back into the engine at any angle of heel, pitch or horrible conditions beyond our experience, then the unit will sooner or later fill with water sloshing up and down the exhaust.
The primary muffler should be positioned well below the engine so any water remaining in the exhaust must run sharply and definitely uphill to get back to the engine. This also means that when discharging, all the water is gravity fed to the muffler and none remains in the hose. If it does, you will find out the second time you start the engine. The muffler should be large enough to easily contain any water that may drain back into it from the hose to overboard. Some hull exhaust outlets have a flap that closes when not actively discharging overboard and these are the first line of defense (or last depending on perspective) from flooding by exciting sea conditions. So the engine exhaust elbow to the muffler should be angled steeply down, from muffler to discharge should be steeply up to a high point and then down all the way to overboard. See the diagram for a number of examples.
 GAS/WATER SEPARATOR
This optional device is an additional muffler added to the exhaust line. The purpose is to separate the water from the exhaust prior to discharge. The water is discharged below the waterline and the gas above. This eliminates the splash of a water-cooled exhaust that most people find annoying. It is certainly a quieter operation with this system, but it also means you cannot check the raw water flow by simply looking over the side. The additional component also takes up extra space and may require yet another hole in your boat.
These items, and an extensive range of waterlocks and mufflers, are available in a variety of materials: plastic, fiberglass and metal are all offered. Metal is, of course, the strongest but the exhaust gasses and saltwater will eventually have their way and you will develop a leak. Plastic is probably cheapest and works fine until the raw water flow fails and uncooled exhaust quickly puts paid to the savings.
Many production boat companies use plastic mufflers as standard on their vessels and there is an optional exhaust temperature alarm available that will immediately notify you of a problem with water flow or increased temperature. If you are quick enough to shut down the generator or if the unit has an auto shut down function that works for exhaust temp, then you might save the muffler and avoid ownership of a smoking lump of twisted rubbish leaking in the bilge.
You are correct, I feel fiberglass is the best option here because it is highly resistant to temperature, strong enough and virtually impervious to water. It is also easily repairable.
PLUMBING
Unless your boat has a sea chest (single source of sea water generally a tank or void below the waterline, to supply vessel needs, engine cooling, generator cooling, toilet flushing, etc), you will need a through-hull and seacock for the generator raw water intake. This should be of adequate size for the particular model, but will commonly be 19 or 25 mm unless we are talking serious power. This should be routed into a raw water strainer to filter out and trap any weed or debris prior to the generator. As this strainer is meant to collect rubbish we need to clean it periodically, so it should be placed in a fashion that does not require explosives to reach.
The seacock also needs to be accessible so we can exercise it regularly to keep it working and quickly shut it off if needed. Marine certified hose needs to be used along with two, all stainless steel, smooth bore hose clamps for all below waterline fittings. An external strainer on the intake through-hull is also a good idea, but many manufacturers caution against using the scoop type with the opening facing forward. In boats under sail this can force water through the circuit when the machine is not running, so place the intake facing aft for your warranties sake.
FUEL
This will depend entirely on your vessel. Is there a space sufficient for a dedicated fuel tank or do you already have multiple tanks, one of which can be used for the generator? Regardless, the fuel should pass through a primary water-separating filter before reaching the generator. Nearly all units (perhaps with the exception of the very small) will have a screw on fuel filter as part of the generator. This should be regarded as the secondary filter and if we are doing the right thing, the fuel should remain spotless virtually forever. It still needs to be changed regularly, though, or you will never know.
Again, the fuel lines should be marine certified and A1 rated to give some assurance of fire resistance and minimal permeability, which will help to keep the perfume al la diesel where it belongs, in the tank. A fuel return line of the same fine standard will need to be run back to the tank from the generator. If you do want a new, separate tank, remember you will also need a new deck fill fitting, vent line and fitting to the outside of the boat, proper fuel fill hose (this has a certified standard also) and electrical grounding may be needed depending on vessel construction or commercial survey requirements. Numerous molded plastic fuel tanks in a variety of shapes and sizes are available off the shelf and may prove the easiest solution. Good ones will come standard with inspection ports, baffles and dedicated places for necessary fittings.
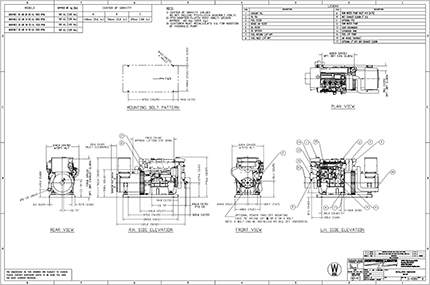
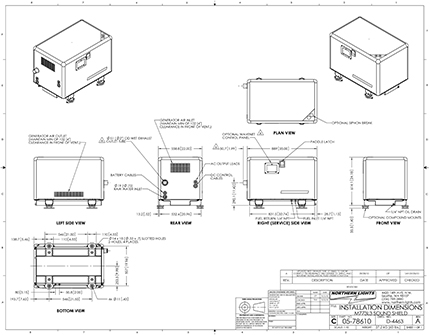
MOUNTS & SHEILDS
Most marine generators will come with a set of standard mounts and many will be fitted with a drip tray base. In some varieties, optional mounts will be offered in addition. These are often called hydrostatic mounts and are designed to further reduce transmitted vibration from the unit. To state the obvious, if your machine has a sound shield to reduce noise levels this shield will have a service access panel. The generator must be orientated so you can best get at this panel. Access will largely determine how much that generator is worth in five years time.
John & Colleen live on their boat, Rancho Relaxo in Langkawi, Malaysia. John worked in marine electrics in Phuket, Thailand for the past few years and now offers boat appraisals and surveys. See www.championmarinesurveys.com for details.
FLOODED ENGINES
These are fairly easy to diagnose; the engine will not turn over or will turn only a little. Essentially, the cylinders have filled or partially filled with water and as water is incompressible, the pistons come to an abrupt stop and are unable to complete the stroke. There may be some clicking sounds that at first might give the impression of a bad starter motor or solenoid. The difference will be in the electrical current flowing to the starter, which will be huge.
The starter is trying really hard to turn over the engine, but it cannot, as the water will not be compressed. Great strain is put upon all the components and if you continue to use the starter something or many things will be badly damaged. The starter/solenoid will get hot very quickly. You could also look at an electrical monitor if fitted and see how many amps are being drawn when attempting to start. Even a voltmeter will tell the story, as battery voltage will be significantly lower under these loads. So stop cranking the engine, pull the injectors out and turn the motor over by hand if possible with a big wrench or use the starter very sparingly; bit-by-bit water will be forced out and will soon be empty.
A good spray into the cylinders with WD40 or such and more rotating to force this out is next. Change the oil and filter immediately. Refit injectors and start; run for 15 minutes or so and again change the oil and filter. It could now be time for a big hard run, but check the oil often and at the first sign of water in the oil change the lot again. Repeat for as long as needed to remove all traces of water from the oil. If you catch the problem early enough there is a good chance no permanent damage has been done. Coming back from a year long absence after the event is another story and the scrap metal dealer might be a better option than a tool kit.