


How to set up your deck for safe, efficient shorthanded sailing and cruising (published June 2014)
The difference between a coastal cruising boat and boats that are set up for offshore sailing lies mainly in the way the deck and sailing systems are laid out. Coastal boats are always near a harbor of refuge and protection from storms. Offshore boats aren’t and have to be ready to self-sufficiently manage high winds, big seas, exposed anchorages and long haul sailing.
Here are deck layout solutions that have proven to work offshore and for long-term blue water cruising.
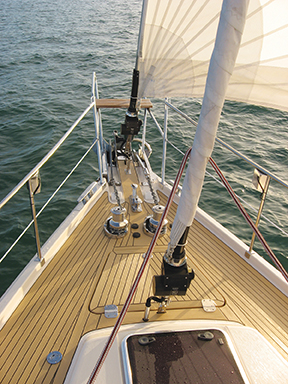
Anchor systems
When you are away from the beaten track, far from marinas and cruising in areas with exposed anchorages, you need to be able to anchor your boat securely and easily. You will need at least four and preferably five anchors aboard. Two should be hooking types such as the Mantus, Bruce, Manson or Rocna. One should be a large fluke type that will work well in soft sand or mud. And one should be a large storm anchor such as a Spade that can be disassembled and stowed below when not needed. The fifth can be a light weight fluke or hooking anchor that can be used as a stern anchor.
Most cruisers use 250 to 300 feet of all chain for their primary rode and a nylon and chain secondary rode. You should have at least two spare nylon and chain rodes aboard.
You should have a heavy duty windlass on the bow that has the lifting power to haul 300 feet of chain and a 60 pound anchor. If you have room on the bow and in the chain locker, then two all chain rodes running to two windlasses will be the ultimate, redundant anchor system.
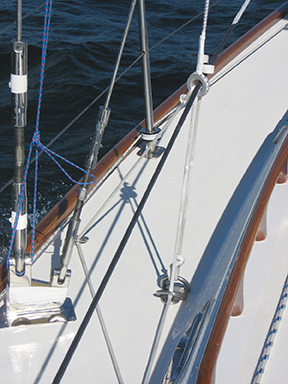
 PadEyes
You need to install stainless steel padeyes as attachment points for your safety harnesses. One should be at the companionway so you can clip on before climbing into the cockpit, and another should be at the helm(s). You should also have one on the cabin top forward of the mast. If you are mounting jack lines on deck permanently, either stainless steel wire or heavy nylon webbing, then you need padeyes at both ends of the side decks as the attachment points. Finally, for rigging the spinnaker or storm sails you will need padeyes positioned on deck to accept the snatch blocks for the sheets. Padeyes need to be through-bolted and reinforced with backing plates.
 Stern Poles
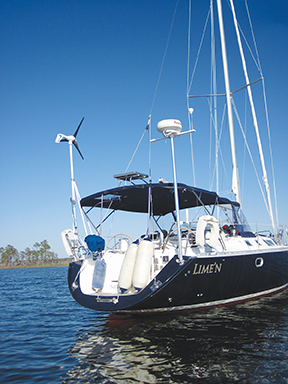
With all of the electronics that modern boats carry, you have to deal with the reality of multiple antennas that need to have a clear view of the sky and the horizon. And, you need to have the radar mounted well above the crews’ heads so they are not irradiated while the radar is running.
Stern poles are a useful way to retrofit antennas to a boat that both keeps them out of the way but also near enough at hand to make them accessible for repairs. Edson and Kato Marine can build custom poles that will work with any combination of antennas and arrays and just about any stern and cockpit configuration.
Wind generators are becoming more and more popular and these need to be mounted where they can spin freely in a full 360 degree rotation without endangering the crew or getting tangled in the running rigging . A stern pole has become the mounting system of choice for most cruisers. If the manufacturer of the wind vane does not offer a marine grade pole, then once again Edson or Kato can buildt a custom one for you.
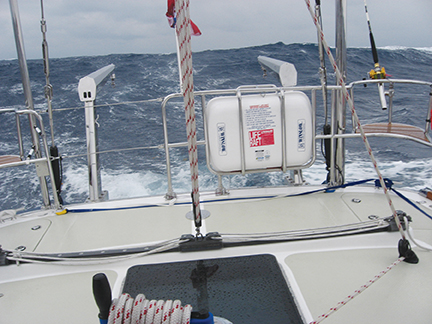 Life Rafts
Your life raft is your back up boat in the instance when the mother ship is no longer viable due to flooding or fire. The raft should be large enough to accommodate the crew. For a couple, a four man raft works best. For a crew of four, a six man raft is best.
The raft should be mounted where it can be easily launched by the smallest crewmember. The best solution is to mount the raft in a bracket on the stern rail or in the aft end of the cockpit where it won’t be soaked with deck spray and where you can easily get it into the water. A stainless steel bracket with a hydro-static release is the best mounting system since the raft will deploy on its own should the boat sink beneath it.
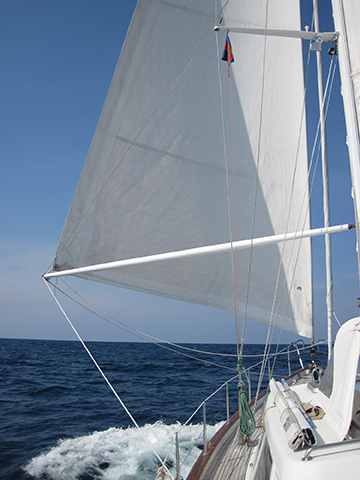
 Sheet Leads
For the genoa sheets, you need to be able to move the sheet cars forward and aft to get the right sheeting angles as the wind increases or decreases. And, when you roll a reef into the genoa or jib, you need to move the sheet car forward to maintain a good sail shape. Most boats have genoa tracks and moveable cars. If you don’t have cars that can be adjusted with control lines from the cockpit, you should retrofit the tracks with new cars, end fittings and control lines.
Another option used on racing boats is to run the sheets through eyes that are positioned with two control lines and the strain on the sheet. The control lines move the eyes up and down and in and out so they are in just the right place for the sheeting angle you need. This will require two padeyes on each side deck and four control lines that lead through turning blocks and line stoppers in the cockpit.
Spinnaker sheet leads can either be fixed blocks on the stern quarters or you can use snatch blocks that are attached to side deck padeyes or to strops that are attached to side deck cleats on the toe rail.
For optimal spinnaker trim, you will want to rig twings to the sheets that run to blocks and padeyes on the side decks and back to a cleat or line stopper in the cockpit; twings allow you to change the angle of the sheet lead so you can control the spinnaker’s leech and twist.
 Downwind Poles
If you are making trade wind passages or just about any ocean passage, you will try to plan the voyage with the wind at your back. You will be running free when ever possible and the best cruising rig will be wing and wing, with the main out to leeward and the genoa poled out to windward. And, most cruisers carry at least one spinnaker, either a fairly small symmetrical chute that you fly from a spinnaker pole or an asymmetrical chute that you fly from a sprit. And there are some cruisers who like to run downwind with the main sail furled and with twin headsails and twin poles.
Spinnaker poles can be mounted on deck in their own stainless steel brackets. But the simplest if not the cheapest way to mount and stow a pole is on the forward side of the mast where you install a track and an adjustable car. When stowed, the poles nest against the mast out of the way. When deployed, you lower the adjustable car and set the pole up for controlling the genoa or spinnaker sheet.
A spinnaker pole needs a topping lift that can be adjusted from the cockpit. Most cruisers add permanently mounted foreguys on both sides so the pole can be trimmed and secured even when the genoa is rolled up all the way. When passagemaking, it is very useful to be able to adjust the size of the poled out headsail from the cockpit and to do this you need to be able to trim both the sail and the pole.
Sprits for asymmetrical chutes most often have to be retrofitted. Selden offers a useful sprit kit that will work on most cruising boats. The sprit can be stowed on the cabin top or in a locker when not being used. To deploy it, you need to run it over the bow roller through a fixed pole guide and then make it fast at the aft end to a fitting on the foredeck. Longer sprits will require a bob stay that runs from the forward end of the sprit to a fixed point low on the bow near the waterline.
Cruising chutes can be made much easier to fly with the help of a spinnaker sock, such as the ATN sock, or with the new top-down furling systems that roll the sail up around a free flying and fairly rigid luff line. Profurl, Bamar Selden and others have all developed unique systems that work.