


Stronger deck handles and no varnishing (published September 2015)
A wise sailor once said to me, “sand or sail”. All his topside teak was unvarnished, gray, but functional. (He on the other hand was varnished, gray, and moderately functional). Having invested the time and effort of a full paint job, gray teak was just not going to cut it on our boat, but Jill and I knew we would rather sail than sand and varnish every year. We replaced our toe rail and coaming-top teak with PlasTEAK and have loved that decision ever since.
For the deck handles we had used a lesser plastic product, bolted from the top down through the cabintop with plugs in the screw holes on the top side of the handles. Within two years the handles were cracking from stress where the screws passed through the handles. These had to be replaced before we left for cruising in a few months, but we wanted a stronger design that would not crack nor pull free of the deck.
To build in more strength and spread the force of the pulldown bolt over a larger area, hopefully to avoid future cracking, we adopted a method found in knockdown furniture, threaded cross dowels. While readily available in steel and zinc versions, stainless steel versions were hard to find so we ended up making them ourselves. Here’s how we made and installed these new handles in a long weekend.
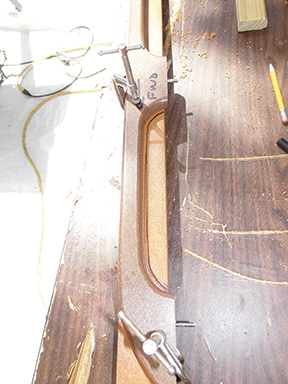
 (Figure 1) The first step was to remove the old handles. You can see the crack in one here. This meant lowering the headliner to access the through bolts in the cabin top. With the bolts loose, a few taps on each side of the handles loosened the sealant on the deck and the handles came free. While the handles all use the same pattern and only differ in length, the through-deck bolts were not evenly spaced so it was critical that we marked each handle with its position on the boat and fore-aft orientation with a Sharpie marker. With all that writing on the old handles, we were now truly committed to making new ones.
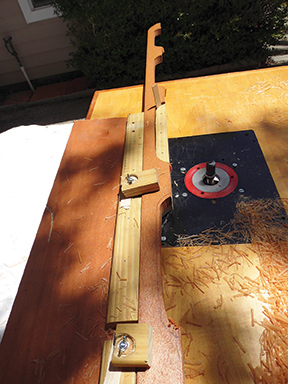
 (Figure 2) The next few hours were spent creating a jig to hold the new plastic while each of the handle loops and ends were shaped on the router table. In reality, I spent many hours thinking about the best way to do this as I knew that investing time in a good template paid dividends when cutting the final product. The final solution was really quite simple. All that is needed is a pattern for cutting out the lower side of a single loop and for cutting the top side of each end of the handle. The jig is about three times the length of a single loop. First, stopping about six inches short of one end of the board, a stop board is nailed parallel to the long edge of the jig at the distance equal to the width (which will be the height of the new handle) of the new plastic stock; we used 2 1/8 by 7/8 inches Plasteak “trim lumber”. The new handles would be just a bit lower in height than the old ones, making them strong, but not so low that one’s knuckles gripping the handles would rub the deck. The old handle was then c-clamped to the jig with the top of the handle against the stop board and one end even with the side of the jig board. The pattern of the two loops and the top side of the handle end were then drawn on the jig. Removing the handle from the jig, the curve of the top side of the handle end and the lower side of the second loop are rough cut out of the jig. It is important not to cut out the loop next to the end of the handle. In the space where the first loop is drawn on the jig, a piece of wood should be nailed which will later provide an index for advancing the raw plastic by the exact length of one loop.
Hold downs were fashioned from some scrap wood held down to the jig with hanger bolts and wing nuts. The old handle was placed back in the jig and the handle end and second loop were routed out of the jig using a router bit with an end bearing.
 (Figure 3) The old handles were used as patterns for marking the loops onto the new Plasteak. A sabre saw was used to rough cut the excess plastic out of the new stock, leaving about an eighth of an inch to be routed out.
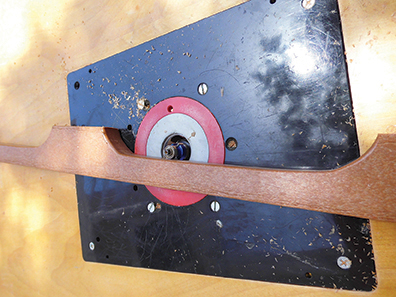
 (Figure 4) For each handle, first the lower side of the end loop is routed out. The handle is then unclamped, the newly routed lower loop is placed over the index block, the top side of the handle end is routed, and then the lower side of the second loop is routed. Repeat this indexing until all the loops are routed out. After the last loop is cut, flip the handle end-for-end in the jig to cut the top side of the second end of the handle. With this jig, all the cutting of six handles took less than an hour.
 (Figure 5) Once all the handles have been cut, the edges that were routed should be rounded over with a quarter round router bit with a guide bearing (aka a round-over bit). This goes quickly, but take care to not rush as it is all too easy to find a finger too close to the spinning router bit.
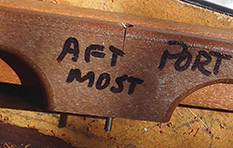
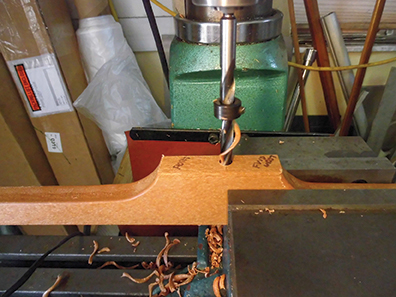 (Figure 6) Next came the drilling of bolt holes up through the bottom of the handle bases but not through the top of the handles. Up until this point, the handles were interchangeable (at least all the long ones for long ones, and short ones for short ones) but since the bolt hole positions are not perfectly spaced on the boat, each new handle was matched up with an old handle and the bottom of the base marked with the position of handle, its fore-aft orientation, and the position of the old bolt hole. Once these holes are drilled, each handle is unique and must be used in its assigned position on the boat. To drill the holes I used a 3/8 inch spur bit with a stop collar. The position of the hole is offset from the end of the drill press vice so there is enough grip in the vice to hold the handle while drilling the holes at the end of the handle.
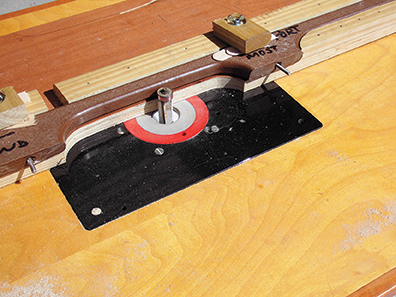
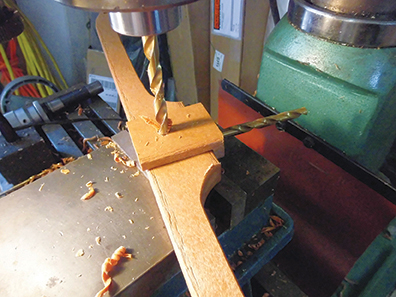 (Figure 7) A second jig was created to position the holes for the cross dowels to align with each of the vertical bolt holes. A scrap of Plasteak was used for this purpose with the shaft of a 3/8 inch drill bit holding the jig in line with the bolt hole while the cross hole was drilled.
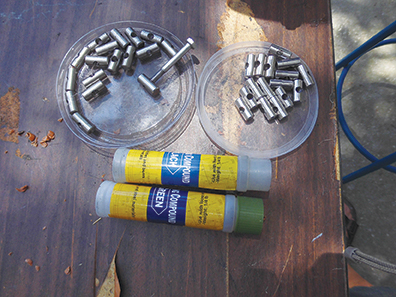 (Figure 8) The cross dowels were made from readily available stainless dowel pins. A 7/32 inch cobalt bit in the mill provided a perpendicular pilot hole for an electro-coated ¼ inch 20 tap. Using these quality tools, the needed 30 (actually 40 to allow for some rejects) dowels were drilled and tapped in about 90 minutes. You may have to rely on a machinist to make these for you, but that could make the dowels the most expensive part of the project.
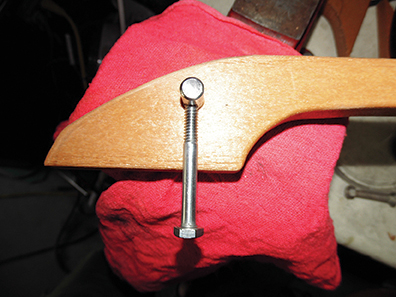 (Figure 9) Before taking the handles to the boat, the dowels were inserted (hammered lightly) into the holes and positioned to align to bolts centered in each hole. Holding the dowel on the end of a bolt helps to align the dowel while starting it in the hole. A long 3/16 inch pin punch can be used to turn the dowels in their hole until the bolt can be started in the threads. Since the vertical holes are 3/8 inches and the bolts ¼ inch, the alignment should not be too difficult. The fit of the dowel should be firm as the dowels are normally slightly oversized. This helps the dowels to stay in position.
On the boat all of the cabintop holes were drilled with a bit just slightly larger than ¼ inch. (The old handles were held on with smaller, 10-24 machine screws). A counter sink bit was used to create a depression around each hole to accept sealant. The base of each handle was masked with tape and the handles were trial fit into place with all bolts checked for fit. This was a tense time as we expected something to be off somewhere but every bolt slid right into place. Neither of us spoke about it until the last bolt was in place lest we jinxed things.
 (Figure 10) The deck top was then masked around the base of each handle. With the 2 ½ inch long bolts still in place by just a turn or two, Jill held the handles up while I pumped some 3M 4200 fast-set sealant under each handle and slipped a couple of small pieces of approximately 1/16 inch thick plastic into the goop to maintain the thickness of the sealant once the bolts were tightened. (Some use ball bearings for this but we just cut some plastic from the lip of a yogurt cup lid). We had to work quickly to place the sealant and spacers, go below to tighten the bolts, and then return to the deck to wipe off the excess sealant before it surfaced over on the 90 degree Florida heat. Jill had lots of small squares of paper towels cut and a trash bag at the ready. A little WD-40 sprayed on the sealant and gloved fingers made the clean-up easier and left a very smooth edge on the sealant. (Acetone should not be used). As soon as each handle was down and the excess sealant removed, the masking tape was removed. We found that a pair of sharp tweezers was the breakthrough tool for both placing the plastic spacers and for removing the masking tape with gloved hands.
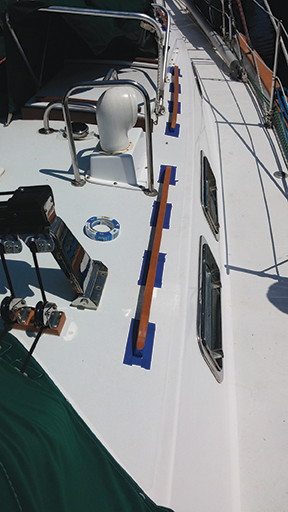
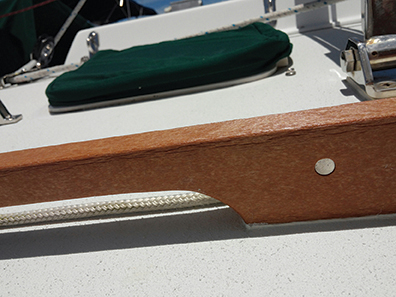 (Figure 11) These handles not only are stronger than any on the boat before but they look great. The stainless cross dowels lend a bit of class or bling to the handles and their 7/8 inch thickness gives them a stout but balanced look and feel. We enjoyed the finished look and waited a day until we put the cabin headliner back up. These handles must look like teak since a fellow boater came by to recommend a varnish he was happy with. He’ll sand, we’ll sail.