


(published February 2012)
My boat is 10 years old, and while I work pretty much constantly on the outside teak, I had done nothing to the cabin sole, and it was beginning to show. Something had to be done, but how? While living aboard with Paddy, my hairy boat cat, work would surely be impossible. As I planned the job, I was suspicious that it was not going to be a small project. Just goes to show you how understated my thinking can be.
PLANNING & PREP
I decided to take advantage of a time when my Island Packet 380, MoDachaidh, would be in a Hilton Head marina while my husband, Paddy and I would be staying in a nearby condo. That we would not be onboard was essential.
Having picked the time, I started researching methods to remove 10-year-old Z-Spar V-975 Satin Sheen Varnish. The helpful folks at Island Packet suggested I use a power sander to remove the finish from the teak and holly veneer, as a heat gun might lift the veneer itself. I bought several thin plastic drop cloths and used blue painters’ masking tape to protect the settees and all the nooks and crannies from dust. Unfortunately, because it is chilly in Hilton Head in the winter, the heater on the boat managed to evenly distribute a substantial coating of fine varnish dust over pretty much everything.
The removal of approximately 75 square feet of varnish took the better part of three days (16 hours). I used 80 grit, then 120 grit sandpaper, mostly with an electric hand sander, and finally by hand in tight spots. And of course, since I am here to tell the tale, I wore a mask.
CHOOSING THE VARNISH
When I finished the sanding, I rewarded myself by choosing the coating. I’d considered the pros and cons, but secretly, I knew I wanted it to be bright and shiny; no more of this subtle, satin sheen. I wanted some flash for all my hard work.
While I had considered polyurethane, the more expensive two-part Bristol Finish and several brands of traditional varnish, I ultimately chose West Marine’s Five Star Premium Varnish (manufactured by Epifanes) because it was tried and true. Jamestown Distributors’ website (www.jamestowndistributors.com) was very helpful, telling me that particularly with real, old-fashioned gloss varnish, I must remove all dust from the area. Having lived aboard for most of the past decade, I thought I knew my boat, but I found dust in places I didn’t know existed! I removed the draping and tape and did the best I could for the better part of two days, but while I was removing the dust, the blower on the furnace was redistributing it.
TECHNIQUE
Technique is very important. While I have used Sikkens Cetol on my exterior teak for years, the cabin sole is not in the sun, nor is the application outside. Plus, I was using a different material, so the whole business was new to me. Jamestown Distributors’ website walked me through the process in detail. They told me to thin the first coat 50% so that the varnish seeps into the wood and gives both a mechanically secure and chemically-sealed basis to which the additional coats can grab (I used Epifanes Thinner).
Since I had vacuumed, wiped and “de-dusted” to the best of my ability, I was no longer going to be able to machine sand between coats. It might have been too aggressive anyhow—the bottom line to fine and durable varnish work is how thick the coating is in the end, so you want to take off as little as possible while still smoothing and refining the surface.
The next three coats (2-4) are “sealer coats” and need to be thinned progressively less, with the fourth coat just 5% thinner. After that, the rest of the coats are applied full strength. Always use a paper paint strainer aimed into a clean, disposable container—never dip your brush directly into the can. The first four coats should be sanded with 220 grit sandpaper (on a sanding block), which takes the wood’s grain out of the surface while leaving successive coats enough “tooth” to hang onto. After each sanding, a thorough wipe with a tack rag is essential to remove all varnish dust from the surface. A damp rag does not work, as it forms an awful paste that needs to be re-sanded.
BRUSHWORK
I chose a good China bristle brush that was two inches across with a beveled tip so I could get into tight places. It cost only $14, but it was a much better choice than a foam or synthetic brush and, more importantly, it was clean! One evening while watching television, I flicked particles of dust and debris from its bristles for over an hour; clearly, this brush did very little to mar the surface of my varnish.
It is best to work consistently with a well-loaded brush so the varnish flows out—you don’t want a thin coat. Work toward the wet edge to avoid brush marks. Practice makes perfect, so you have time to perfect your style while sanding out imperfections between the first few coats.
 TIMING BETWEEN COATS
For the first couple of coats, I gave my cabin sole the recommended 24 hours drying time, but by the third coat I was getting plugged sandpaper and little rolls of varnish surface rather than sanding dust. I was certain that this was a function of the temperature and humidity, so I turned the heat up to 77 degrees each night when I left the boat and gave the third coat 48 hours to dry. This worked well. I was back to making sanding dust and no plugged paper! From this point on I allowed at least 48 hours between coats.
The next few coats (and the sanding between) are the ones that give that elegant glossy smoothness. Every other day, I would come to the boat and sand, then wipe with my tack rag, then put on a coat of varnish. Each coat took between four and five hours to complete. Here, we are making tradeoffs between beauty and utility. The more you sand (now using 320 grit), the smoother the surface gets, resulting in a more perfect finish; however, the surface also gets thinner, resulting in less durability. I opted for a middle ground—nine total coats with moderate sanding in between.
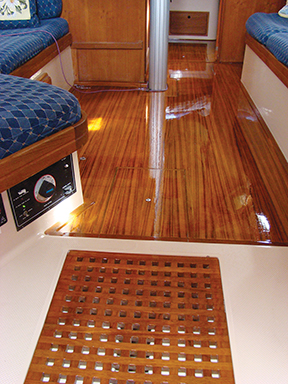 After I applied my last coat, I had a few more days before my planned departure for the Bahamas, so I left the furnace on high and didn’t tread on my beautiful new cabin sole, as it wasn’t “hard” yet and I didn’t want to spoil all that work. In the future, I plan to periodically sand the surface and add a coat of new varnish. I hope never to “start from scratch” again!
Time
Sanding old varnish 16 hours
Cleaning to remove dust 10 hours
Sanding and varnishing 40.5 hours
Total 66.5 hours
Materials
.002 mil plastic sheeting 12.00
Masking tape 3.99
Sandpaper 15.00
15 Mouse sheets 15.00
Varnish 127.96
Thinner 14.49
Brush 14.00
Brush cleaner 5.99
Paper strainers 2.25
Quart containers 7.83
Tack rags 6.00
Total 224.51