


After nine years at sea, we are proof that a cruising sailboat is a maintenance treadmill. But occasionally there is equipment we replace because newer, better options have come onto the market. Investing in that equipment now can save us grief and expense later (published October 2016)
RAYMARINE CHARTPLOTTER AND RADAR
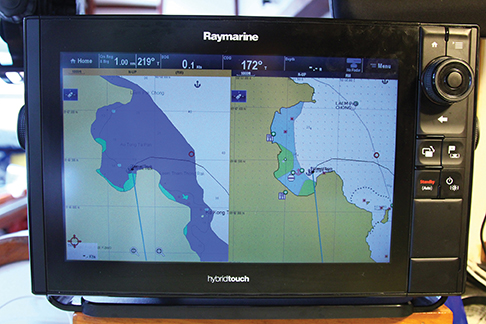 We just upgraded our nine year old navigation system to a new Raymarine, HybridTouch eS128 and Color HD radome (www.raymarine.com). There are so many amazing benefits to this new equipment, it warrants an entire article to tell about it. But briefly, I wanted the larger 12.1 inch screen for easier viewing and better spatial awareness, like what I used to get using paper charts.
The machine also has Wi-Fi to connect to the internet to install new software and chart updates. Now we can choose between Navionics, C-Maps and Lighthouse charts, and can display two different chart brands at the same time to get a comparison, since not all chart brands have the same level of detail. Using the new Raymarine high definition DownVision™ depth sounder, depths can be placed and saved directly on our chart programs as we sail the world. These same depth recordings are sent via internet to Navionics, the chart maker we prefer. After filtering this information, Navionics may choose to use this information to update their charts. The new touch screen is far faster and intuitive to use than knobs and buttons, although knobs and buttons are still present on the eS128 for full functionality by either method. Our AIS transponder displays targets on the screen, and we can overlay current GRIB files on the charts. I love this chartplotter.
ALPENGLOW CEILING LIGHTS
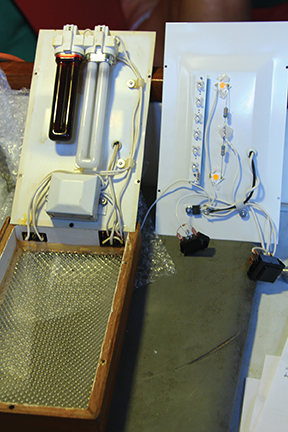 Our four Alpenglow compact fluorescent (CFL) ceiling lights were always the brightest most energy efficient cabin lights on our boat till LEDs became the lighting of choice. Recently we sent off for the upgrade package which consists of a new back plate, attached red night light, white lights, wiring and new switches. However, it would be far easier and, if one is not experienced at tight soldering, safer to send the old light fixture to Alpenglow (www.alpenglowlights.com) so they can do the upgrade and retain the warranty. The labor cost is about $15 per light and the materials cost is $85 for each of our 10 by 16 inch units with the red night light or $65 without the red light, plus shipping. But since we were on the other side of the world, I had to tackle the conversion myself. After applying a lot of flux to the connections, I used a pencil tip 30W soldering gun with a momentary 130W switch to melt the solder. Supplied by Alpenglow is a wiring diagram and on one new conversion back plate, the wires were taped and labeled. There was still room for error so once I had one unit working, it became my wiring guide for the other three.
Our upgraded Alpenglow overhead lights have a high low switch for the red light and a similar switch for the white light. One new white light draws half an amp which is about a 33 percent energy savings but we get light that is 30 percent brighter. That is on the high setting which we do not often need. The low power setting draws a quarter of an amp. Even the old CFL bulbs rarely needed attention but the new LEDs are projected to last 50,000 hours, about 25 to 30 years. With the modern advancements of LED technology, the new Alpenglow lights are the same warm white color as before. If a cruiser wants to install new ceiling lights, they come in the 10 by six inch and seven by seven size and four different wood finishes. Reading and berth lights are also available. The LED has been such a positive upgrade that now, in some anchorages, we leave the cockpit Alpenglow on all night to discourage thieves. This upgrade has been a very good investment.
MAN SHIP HATCHES
 In preparing to leave Rhode Island, we replaced all the traditional looking wood hatches with new stainless steel hatches made by Man Ship (www.manshipmarine.com), located in Taiwan. On all the larger hatches I immediately removed the factory supplied levered, knob/pin lock hatch supports. Those supports required two hands to open or close a hatch which is not only inconvenient, but a safety hazard while at sea. In their place was installed spring supports which are far quicker and easier to use. Even on one of the hatches where the original support was removed, the welded support pin rusted and fell off. Otherwise the hatches have held up well. However, on the least opened hatch, the plastic handle assemblies have disintegrated. Fortunately there are distributors in several countries so obtaining replacements is not difficult.
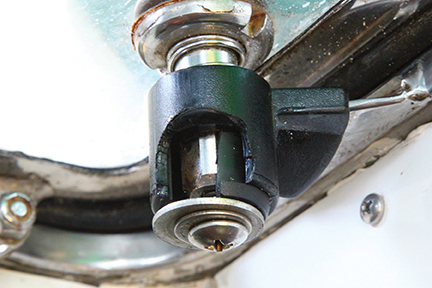
MANTUS SWIVEL
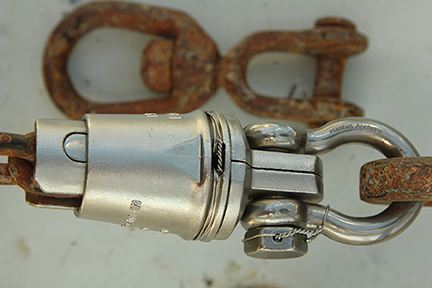 The weakest link in our anchoring system always appeared to be the pin and shackle, which connected to the end link of chain. Additionally, because of the age of our swivel, there was no telling how much strength was left in that vital linkage before failure. It was coincidence that at that moment a Mantus Swivel (www.mantusanchors.com) advertisement caught my eye.
Installing the Mantus Swivel, all my hesitations of attaching that final link of chain to the anchor were relieved. The pin securing the Mantis is unique. Being oblong, it fully takes up the interior area of the chain link reducing point loading on the link and reducing the possibility of elongation by spreading the load on a greater portion of the link.
The ball and socket swivel joint looks strong and because of its larger surface to surface contact, should rotate more easily than my old steel swivel. The strong and well machined Mantus shackle attaching the leading end of the swivel to the anchor leaves me no worries. After screwing tight the clevis bolt with a long wrench, the hex head is wire tied to the shackle. The seizing wire is attached to the bolt head then twisted up to the shackle and secured out of the way of the leading edge of the swivel, eliminating possible wear on the wire and giving a tightening torque to the bolt.
The way the swivel and shackle are attached to the anchor, there is no likelihood of the swivel being affected by side loading. The profile width of the Mantus Swivel is narrower than my discarded steel swivel so there is no problem with it sliding over the bow roller.
Some experts insist on not using stainless steel in a ground tackle system although there are anchor chains made of stainless steel. Stainless steel in any application can have a sudden and unforeseeable failure. This is why it is cheap insurance to always buy stainless steel products made to U.S. specifications and quality control and shackles that are marked with load tested specifications or manufacturer’s name. The Mantus Swivel is made of cast 316L (the L stands for low carbon), electro-polished, stainless steel which is far more rust resistant than 304 or 316 stainless. The Mantus Swivel sized for our G30, 3/8 inch chain is load tested to be five times stronger than the chain; so now it appears our chain is the weak link in our anchoring system. At a cost of $85, it is a good anchoring investment.
POLYETHENE “ LUMBER”
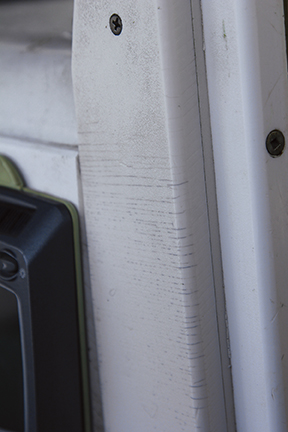 In preparing for a long voyage, I had removed all the deteriorated teak companionway trim and replaced it with polyethylene “lumber”. It looked good for a long time with no maintenance. But now countless horizontal fissures have developed across two pieces of exterior trim. So far it does not appear to be a structural concern but the cosmetics are detracting. All the other pieces of interior and exterior trim are holding up as expected.
SHADETREE AWNING
It has been over eight years since the blazing sun in Belize made us wear dark sunglasses, lather on the sun block and put up the Shadetree (www.shadetreefabricshelters.com) awning for the first time. After all these years and exposure to equatorial sun, our two awnings show only the slightest of wear. We can fully attest to the endurance of the coated Dacron material which is also waterproof.
We could have somehow rigged big rectangles of material for an awning but we wanted something which would be streamlined and steady in a breeze and give good head clearance plus shed rain water so we can leave hatches open in a light shower.
The tunnel shape of the Shadetree does everything we want. This shape is created by using carbon/fiberglass support wands similar to what mountain climbers use for their tents. The wands slip through their individual channels on the underside of the awning and then are secured at the lifelines with their individual pocket straps. The tensioned wands bend to give the awning its arched shape.
The flexible supports and the awnings shape can deform in a side loading breeze to dump wind load and reform when the wind abates. But still, we found it best to take down any awning including the Shadetree, in a strong breeze. We stow extra wands just in case any should crack.
The standard top color is a light shade of grey called Oyster White, which will shed the sun’s heat, and the underside is white. Custom colors can be ordered. The awnings come in stock sizes but since we have a hard dodger topped with solar panels, we chose to have a stock awning made shorter. Full length stock awnings come with a slit on the aft end to accommodate a boom topping lift.
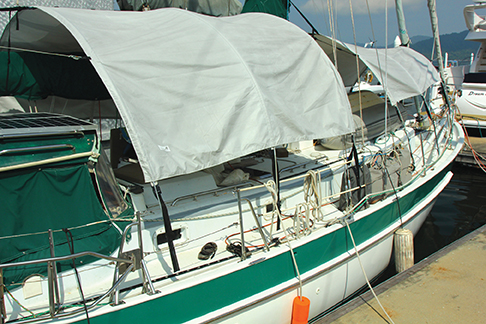 When stowed, each awning and its hardware easily fold into a long color coded pouch. The Shadetree awnings are one of the better investments we have made on Brick House. So while we are cruising the comfortable waters of Southeast Asia, we are installing equipment and fine tuning our boat for the big waters ahead, the Indian Ocean.
Patrick and Rebecca Childress sailed away from Newport, Rhode Island nine years ago on what was supposed to be a four year cruise. Now there is no end in sight.