


Sunshine and blue skies: they’re the hallmark of another terrific day spent sailing on moderate blue seas, and they account for the vast majority of days at sea. There are, however, exceptions. (published October 2015)
Seeker was a well-found sloop with a few miles under her keel. The year before, immediately after Peter had purchased her, we had delivered her from Portsmouth, RI to the B.V.I., where Peter spent months aboard getting used to her ways. We were now ready to take her south again, leaving the Chesapeake Bay in early December. The near term forecast wasn’t looking too special.
The 48, and earlier 96, hours surface pressure forecasts indicated a low pressure system would be approaching us in the next 48 hours if we departed immediately. We would have time to cross the Gulf Stream, but we would almost inevitably encounter 50 knot winds. After a serious conversation with Peter and considering his experience, goals and condition of the vessel, we decided to leave. Our first line of defense was to put ourselves in the best possible place, relative to the Gulf Stream and the weather pattern. We raced to cross the Stream and edge to the south by heading east southeast to avoid the worst of the storm.
REDUCING HEADSAIL POWER
Seeker had a reliable roller furling jib, which made it relatively easy to downshift the headsail as the winds slowly built. Our main was easily reefed as well. Other vessels may not be quite so fortunate, but there are plenty of tricks that can be applied when the going gets rough. Being early to the party will help to ensure a happy ending to the adventure.
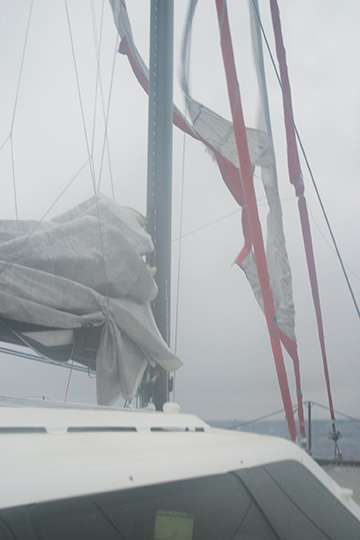
Shortening sail is usually best started at the front of the boat. Especially when beating, a firmly sheeted main helps to support the mast, and as the wind and seas build, you will want the mast well supported. If shortening headsails requires dropping one sail and hoisting another, you will certainly want to accomplish that feat early in the program. Roller furlers, of course, are a huge help, but you will want to make sure that there are no chafe points on the take up line, and it is appropriately sized for the task. If the take up line breaks in the middle of a storm you will be “blessed” with more sail than you want and few immediate solutions. Hydraulic roller furlers can present different problems. If they refuse to stop, you will want to be immediately aware of the location for the cutoff switch or circuit breaker, and if they refuse to start, you should be knowledgeable about how the manual backup works. More likely than not, it will be a long and tedious job to hand-furl the jib, and that task will take a lot of time. Be prepared early.

With plenty of time to prepare for the expected 50 knot winds, we could hank the storm jib on to the inner forestay early, check its sheet leads and inspect all of the other on-deck details that would become so important. If your storm jib is meant to attach to the headstay, and you have a roller furling jib, you should be aware that you will either need to take your jib down prior to setting the storm jib or consider an ATN Gale Sail (http://www.atninc.com/atn-gale-sail-sailing-equipment.shtml). It’s times like this that it becomes apparent that storm sails should be checked in good weather to ensure that they’re easily mounted and sheet leads are identified. When the weather falls apart, you will not want to be bothered by sails that don’t fit or require special tools and multiple people to prepare.
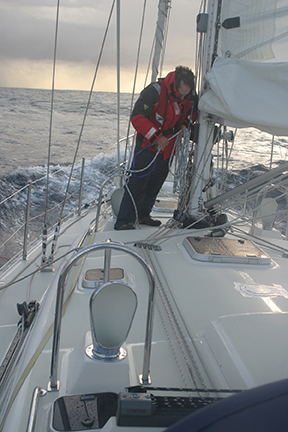
Aboard Seeker the rig had been checked and jacklines had been led prior to departure. We confirmed that all of the reefs in the main were correctly led. When the wind began to rise a couple of days after departure, we knew that we wanted to shorten the headsail first, allowing the main to help support the back of the mast. The running backstays had been brought back into position prior to entering the Gulf Stream. Even though we were reaching and running, the main’s leech provided minimal support, preparing us for the unexpected wind shift that might require us to go head to wind. Overloading the front of the rig without supporting the back of the mast invites potential problems.
As the wind continued to rise, we reefed the main early, stepping the process by shortening the headsail first and reefing the main next. Often the breeze increases a few knots at night, sometimes after midnight. If we were close to requiring a reef before sunset, while cruising or on deliveries we always put one in before dark. Often after midnight we have been happy that we had done so, avoiding a middle of the night call to reef the main in a quickly rising wind.
REEFING
Reefing the main varies from boat to boat, depending on the type of reefing system. Slab reefing—especially if lazy jacks are deployed—is often the most reliable system. Ease the vang, ease the mainsheet, lower the halyard, attach the inboard reef point, tighten the halyard, take up the outboard reef line, sheet back on, vang back on: the reef is complete. If you are going to tie up the foot of the main to the boom, you should put an additional safety line through the new reef clew and around the boom. If the original reef line breaks and you don’t have a safety line through the new clew, the main will rip where it has been tied to the boom along the new foot. Additionally, when using lazy jacks, be aware that they will often chafe the leeward side of the main or along the rolled up foot of the main. Chafe becomes a constant enemy and one which needs to be monitored and minimized.
Other reefing systems have other potential problems, most of which can be solved by having the boom at the correct angle to the mast while furling the sail. In-mast furlers can have an infinite number of reef points, but they may also have problems with battens as the vertical battens enter the mast. The sail should be rolled to weather so the main has a smooth and easy entry into the mast. That isn’t always convenient if you do the initial reefing on a starboard tack, and later the wind builds while you’re on port. You may be able to get away with continuing in the same direction, but care should be given to make sure that you roll the sail up smoothly within the mast. Jamming the sail into the mast will only result in more significant problems later. To further avoid problems, control the entry of the sail into the mast by having the boom at the right height / angle to the mast. The luff of the sail should enter the mast without wrinkles, and if too many wrinkles are happening at the head of the main while the sail is too tight nearer the tack, you will need to adjust the boom height to ensure that the tension along the luff is uniform.
In-boom furlers have still another idiosyncrasy that you should be aware of. As the mandrel winds the main sail within the boom, the bolt rope on the luff starts to stack on top of itself. As the process continues, the bolt rope may start to edge itself aft, away from the mast. When you re-hoist the main, the angle of the bolt rope from the boom to the feeder may be so abrupt that the main rips along the bolt rope. The solution is to try to keep the bolt rope near the mast as the reef is put in the main. When re-hoisting, take care that the bolt rope and luff of the main are fed smoothly past the feeder and into the track on the mast.
Emergency procedures should always be reviewed prior to departure. With heavy weather approaching Seeker we ran through them again: liferaft, grab bag, EPIRB, man overboard procedures. Everything was again discussed while the weather was still pleasant and people could focus on what we had available and how to use it. As always, we had several lines tied off that were quickly and easily available, tied to the push pit and which could be used as warps or to tie off a mainsail that was quickly dropped.
BELOW DECK PREPARATIONS
Down below, everything should have been stowed prior to departure. Was it? We checked again. What leaks? We checked for dorade covers, and when those weren’t found, we made sure that dorades faced aft, away from oncoming spray and green water that might leave the decks awash. If we were expecting even heavier conditions, we might have sealed the dorades entirely. It’s important to keep the living space safe, warm and dry. Are the tools handy and stowed in a safe, secure place, ready to use in an emergency? Is the handheld VHF charged and available? Do you have the handheld GPS stowed in a place to protect it from lightning? The oven will work as a Faraday cage if you place the handheld GPS inside of it, providing some protection to that piece of navigation equipment in the event of a lightning strike. Are there sufficient handholds down below? Or do lines need to be run so people can move around without fear of being slammed across the cabin?
Preparation for heavy weather takes on many facets, including meal planning. Have quick, easy meals readily available as well as high energy snacks located in convenient, secure places. Boiling water in a seaway can cause huge problems. On one delivery that I did several years ago, bringing a boat up from South Africa, we came across another crew that had experienced a serious problem. While fixing Thanksgiving Dinner, the cook had been boiling a large pot of water while in a heavy seaway. The boat lurched. The pot jumped off the stove, and she suffered extremely bad burns as they sailed for three more days to St. Helena where she spent another three days in the hospital. Have the spaghetti a couple of days before you get into heavy weather, and have the baked lasagna or sandwiches when you’re actually dealing with the heavy weather and the breaking waves.
If people are susceptible to seasickness, they should take their seasickness medication at least a day before the weather starts to deteriorate and drink plenty of water. One should address the mechanical side of the preparations early, as well. As heavy weather approached, our batteries were fully charged, and we made fresh water while the sea state was still relatively benign. Occasionally, the water intake is not located along the vessel’s centerline, and watermakers may refuse to function properly. While winds are still calm, fuel from jerry jugs can be transferred to the main fuel tank. Some boats may have a day tank that requires filling. Other boats may not be able to draw fuel from some of their internal tanks because the lift pump may not pump fuel from the tank on the “low side” of the boat. We made sure that all of our options were open and available. The Racor filter, belts and oil levels were checked. Those things can be checked while the wind is blowing 50 and the seas are 25 to 30 feet high, but it seems to make sense to check them while conditions aren’t so harsh.
This trip proved to me yet again that early preparation creates a less stressful situation while reducing risk to both crew and vessel. As the weather goes to hell, you can sit back and enjoy the show, knowing that you’re prepared for it, and you’re a step ahead of the game. Now, years later, Peter and Seeker have crossed the South Pacific, well prepared and tested. Preparation continues to play a role in his progress. Get to the party early and dress appropriately.
 Bill Biewenga is a navigator, delivery skipper and weather router. His websites are www.weather4sailors.com and www.WxAdvantage.com. He can be contacted at billbiewenga@cox.net